CNN을 사용한 Captcha bypass
라온화이트햇 핵심연구팀 원요한 kuroneko9505@gmail.com
CNN을 사용한 Captcha bypass
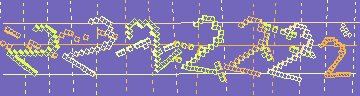
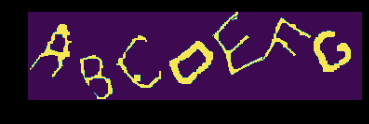
Target Captcha
Captcha
CAPTCHA(Completely Automated Public Turing test to tell Computers and Humans Apart, 완전 자동화된 사람과 컴퓨터 판별, 캡차)는 HIP(Human Interaction Proof) 기술의 일종으로, 어떠한 사용자가 실제 사람인지 컴퓨터 프로그램인지를 구별하기 위해 사용되는 방법이다. – wiki
Catcha를 우회하기위한 목적은 회원가입/글쓰기 등의 자동화를 하기 위함이다. 하지만 각각 사이트 별로 구현된 Captcha 구현방식이 대부분 다르기 때문에 각 사이트 별로 우회방법을 생각해봐야한다. 따라서 어느정도 우회하기위한 방법으로는 아래와 같은 방법을 생각해볼 수 있다.
- OCR 라이브러리를 사용한 자동화
- 머신러닝을 활용한 자동화
- Captcha 이미지를 사용자에게 보여주고 직접 입력해서 인증
1번을 먼저 테스트해보기 위해서 많은 사람들이 쓰는 OCR engine인 tesseract를 사용해서 우회가 가능한지 테스트를 진행해보려고 한다.
Tesseract
테서랙트(Tesseract)는 다양한 운영 체제를 위한 광학 문자 인식 엔진이다.[3] 이 소프트웨어는 Apache License, 버전 2.0,[4][5]에 따라 배포되는 무료 소프트웨어이며 2006년부터 Google에서 개발을 후원했다.[6] – wiki
tesseract를 설치하기 위해서 아래의 명령어를 입력했다.
$ apt-get install tesseract-ocr libtesseract-dev
$ apt-get install python-pip
$ pip3 install pytesseract
이제 이미지 인식을 위해서 이미지 전처리 과정을 거쳐야한다. 따라서 image processing이 어떤식으로 이뤄지는지 알아야할 필요가 있다. Captcha의 문자를 인식하기 위해 computer vision에서 사용하는 방법(noise reduction, blur, filter, etc…)으로 비교적 깨끗하게 문자만 이미지에 남길 수 있도록 만들어주는 과정을 전처리라고 한다.
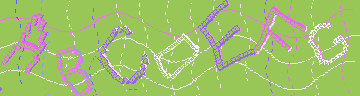
Previous Target Captcha
Pre-processed Target Captcha
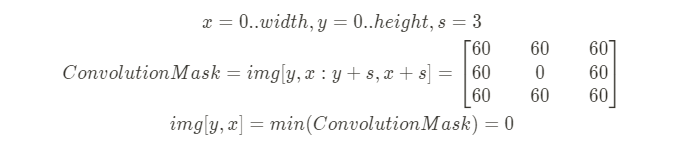
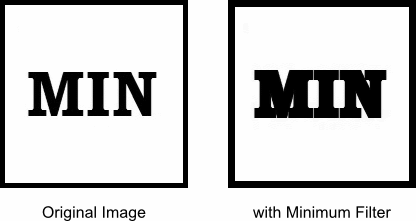
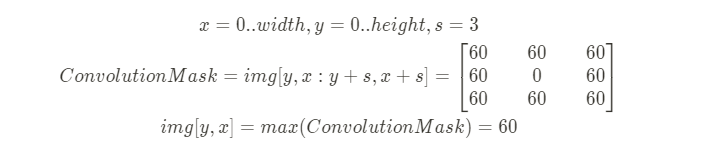
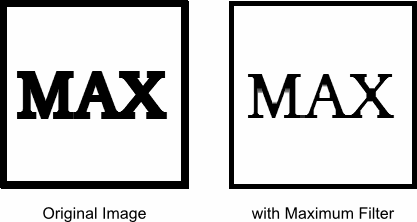
이미지 전처리 과정에서 주로 사용되는 알고리즘과 필터는 아래와 같다.
MinFilter: Convolution Mask 내 minimum 값을 (x, y) 좌표 픽셀에 설정
MaxFilter: Convolution Mask 내 maximum 값을 (x, y) 좌표 픽셀에 설정
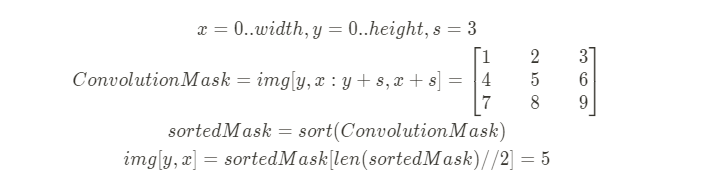
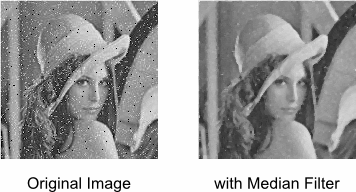
MedianFilter: Convolution Mask 내 Median(중간) 값을 (x, y) 좌표 픽셀에 설정, noise reduction 가능
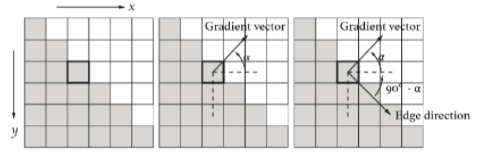
Contour (윤곽): Edge detection 알고리즘을 통해 Contour 좌표에 픽셀 설정, 2D에서는 Edge detection을 위해서 image gradient를 사용하는데, 이는 Edge vector와 gradient vector가 수직관계에 있다는 점을 이용한다.

Gradient vector의 각도(alpha)를 얻은 이후, 각이 90-alpha를 가지는 vector가 edge임을 알 수 있다.
fill in Contour: Contour 내부 좌표에 픽셀 설정

Bounding Box size based Filtering: Contour에 대한 Bounding Box를 얻어내고 특정 width, height의 threshold(임계)값을 기준으로 노이즈 제거를 위한 픽셀 설정

위와 같이 Filtering, Noise reduction 작업을 처리한 다음 tesseract에 적용시켜보면 아래의 그림과 같이 정확하지 않은 값이 나오는 것을 볼 수 있다.

failure
위와 같이 잘못된 결과가 나온 이유는 단순하게 생각해도 전처리를 거친 문자가 tesseract에서 처리하는 방식이 달라서 발생하는 문제인 것으로 보인다. 그래서 머신 러닝을 사용해서 타겟 Captcha 이미지를 전처리한 문자를 학습시켜 인식시키는 것이 높은 확률로 인식할 수 있을 것으로 보였다. 따라서 머신 러닝으로 이미지를 학습시키기 위해 CNN(합성곱 신경망)을 사용하기로 결정했다.
먼저 머신 러닝을 위한 라이브러리를 설치해야하므로 아래와 같은 명령어를 입력했다.
$ pip3 install tensorflow keras numpy pillow
예제 코드를 참고해서 아래와 같은 코드를 작성했고, result 폴더에 전처리 후 문자별로 쪼갠 이미지를 resizing해서 저장하고 파일명으로 labeling하도록 만들었다.
import tensorflow as tf
import numpy as np
import glob
from PIL import Image
from keras import models, layers
custom_images = []
custom_labels = []
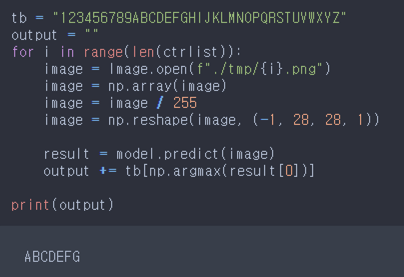
tb = "123456789abcdefghijklmnopqrstuvwxyz".upper()
for path in glob.glob("./result/*.png"):
ch, _, _ = os.path.basename(path).split(".")[0].split("_")
image = Image.open(path)
image = np.array(image)
custom_images += [ np.reshape(image, (28, 28, 1)) / 255 ]
custom_labels += [ tb.index(ch) ]
train_images = tf.concat([ custom_images ], 0)
train_labels = tf.concat([ custom_labels ], 0)
train_images = test_images = tf.concat([ custom_images ], 0)
train_labels = test_labels = tf.concat([ custom_labels ], 0)
model = models.Sequential()
model.add(layers.Conv2D(32, (3, 3), activation='relu', input_shape=(28, 28, 1)))
model.add(layers.MaxPooling2D((2, 2)))
model.add(layers.Conv2D(64, (3, 3), activation='relu'))
model.add(layers.MaxPooling2D((2, 2)))
model.add(layers.Conv2D(64, (3, 3), activation='relu'))
model.add(layers.Flatten())
model.add(layers.Dense(64, activation='relu'))
model.add(layers.Dense(36, activation='softmax'))
model.compile(optimizer='adam',
loss='sparse_categorical_crossentropy',
metrics=['accuracy'])
model.fit(train_images, train_labels, epochs=100)
_, acc = model.evaluate(test_images, test_labels, verbose=2)
print('accuracy: {:5.2f}%'.format(100*acc))
model.save("captcha_model.h5")
이제 전처리한 이미지를 문자별로 저장하는 일만 남았는데, 아이디어는 아래와 같다.
- Contour 리스트를 얻어온다.
- Contour의 bounding box의 크기를 얻어온다.
- 해당 크기가 threshold보다 작을 경우, 그대로 contour list에 추가
- 아닐 경우에 연결된 문자들의 minimum pixel frequency를 기준으로 threshold보다 작을 때까지 분할 정복
Pseudo 코드로 나타내면 아래와 같다.
height_threshold = 20
width_threshold = 80
min_width = 30
ctrs = findContours(img)
for ctr in ctrs:
    x,y,w,h = getBoundingBox(ctr)
    if h < height_threshold:
        continue
    size = 100000
    if w > width_threshold:
        def conquer(im, start, end, target, ctrlist):
            if end - start < width_threshold:
                return
            window = 25
            for i in range(window):
                tmpSize = getFrequencyIndex(im, start + i, end - i, target) + i
                if size > tmpSize:
                    size = tmpSize

            if size >= min_width and size < width_threshold:
                # left box y range setup & append ctrlist

            diff = end - (start + size)
            if diff >= min_width and size < width_threshold:
                # right box y range setup & append ctrlist

            if size > width_threshold - 20:
                conquer(im, start, start + size, target, ctrlist)
            if diff > width_threshold - 20:
                conquer(im, start + size, end, target, ctrlist)

        conquer(im, x, x + w, 255, ctrlist)
    else:
        # append ctrlist


위의 코드를 직접 구현하게 된다면, 위의 샘플 그림과 같이 이미지를 얻을 수 있게 되고 result 경로에 labeling해서 넣어준 이후 학습 시키면 아래의 그림과 같이 정상적으로 인식이 되는 것을 볼 수 있다.