Finding bugs with CodeQL : Part 1
라온화이트햇 핵심연구팀 김재유
Intro
CodeQL은 개발자가 자동으로 보안 점검을 하거나 보안 연구원들이 변종 분석(Variant Analysis)을 수행할 수 있는 분석 엔진입니다. CodeQL에서는 code를 데이터로 취급하며, 취약점을 포함한 버그 패턴들을 code로 부터 만들어낸 데이터베이스에서 실행할 수 있는 쿼리로 정형화해서 이용합니다.
변종 분석(Variant Analysis)라 함은, 알려진 취약점을 기준 삼아 비슷한 유형의 취약점을 찾아내는 분석 방법입니다. CodeQL은 취약점을 쿼리화할 수 있기 때문에 변종 분석에 활용하기에 효율적입니다. 또한 알려진 취약점 뿐만 아니라 새로운 유형의 취약점을 찾기 위해 직접 쿼리화할 수 있습니다.
이 글에서는 이러한 CodeQL을 이용하여 버그를 찾는 방법을 소개하려고 합니다. 파트 1에서는 CodeQL의 동작 원리와, 기본적인 사용 방법을, 파트 2에서는 실제로 취약점을 찾기위해 작성된 QL들을 분석하면서 Case Study들을 소개해드릴려고 합니다.
Internal
우선 CodeQL 쿼리를 직접 작성하여 사용해보기에 앞서, CodeQL이 내부적으로 동작하는 과정을 짚어가고 넘어가겠습니다.
CodeQL을 이용한 분석은 다음과 같은 과정으로 진행됩니다.
- 대상 code를 데이터화 하여 CodeQL Database를 생성합니다.
- 만들어진 CodeQL Database를 대상으로 CodeQL 쿼리로 질의합니다.
- 쿼리 결과를 분석합니다.
Create CodeQL Database
CodeQL Database를 생성하는 과정은 다음과 같이 진행됩니다.
- Init : CodeQL Database 디렉토리 구조를 생성합니다.
- codeql database init …
- Extraction : 대상 code로부터 관계 표현들을 추출합니다.
- codeql database trace-command …
- Finalize : 생성된 모든 관계 표현들을 import하여 하나의 Database로 만듭니다.
- codeql database finalize …
위의 모든 일련의 과정은 codeql database create … 명령어를 통해서 한번에 수행 가능합니다.
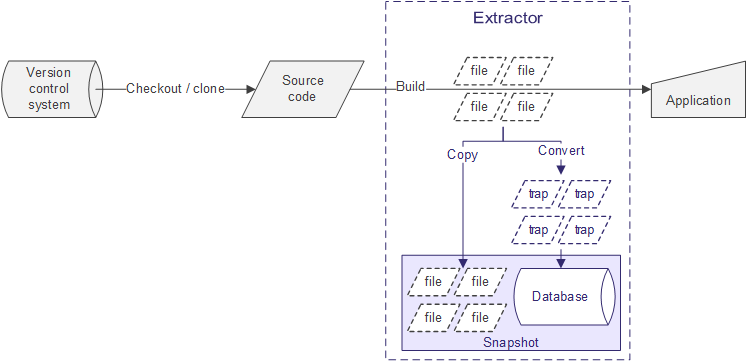
CodeQL이 CodeQL Database를 생성할때, 가장 먼저 하는 일은 각 code 파일들로부터 관계 표현들을 추출하는 것입니다. class, function, params, variable, expression, statement등 다양한 code 상에서 표현될 수 있는 정보들이 추출되며 이를 관계 표현으로 만들어 저장하게 됩니다. CodeQL에서 이러한 과정을 수행하는 프로세서를 extractor라고 부르며 CodeQL에서 지원하는 각자 언어마다 하나의 extractor를 가지고 있습니다.
extractor가 code에서 관계 표현들을 추출하는 과정은 다음과 같습니다.
- 작성된 언어가 compiled language일 경우(c/c++, java, …)
- 정상적인 빌드 과정을 모니터링하고 모니터링 과정중에 컴파일 되는 대상 code들을 수집합니다.
- 수집된 code으로부터 관계 표현들을 해석합니다.
- 작성된 언어가 interpreter language일 경우(python, javascript, …)
- 정상적인 실행 과정을 모니터링하고 모니터링 과정중에 실행 되는 code들을 수집합니다.
- 수집된 code으로부터 관계 표현들을 해석합니다.
실제로 컴파일/실행 되는 범위의 code들만을 수집하여 불필요한 분석 정보들을 배제한다는 것을 확인할 수 있습니다. 만약 빌드 config 옵션에 따라서 빌드 범위가 달라지는 큰 규모의 프로젝트의 경우에 효율적으로 분석을 수행할 수 있습니다.
CodeQL을 실행했을 때 볼 수 있는 빌드 모니터링 과정입니다. 예시로는 리눅스 커널을 대상으로 CodeQL Database를 만드는 과정입니다.
# codeql database creating history
...
[2021-04-30 10:17:24] [build-stdout]   CC      arch/x86/entry/syscall_32.o
[2021-04-30 10:17:25] [build-stdout]   AR      arch/x86/entry/built-in.a
[2021-04-30 10:17:25] [build-stdout]   CC      arch/x86/events/amd/core.o
[2021-04-30 10:17:26] [build-stdout]   CC      arch/x86/events/amd/uncore.o
[2021-04-30 10:17:27] [build-stdout]   CC      arch/x86/events/amd/ibs.o
[2021-04-30 10:17:28] [build-stdout]   CC      arch/x86/events/amd/iommu.o
[2021-04-30 10:17:29] [build-stdout]   AR      arch/x86/events/amd/built-in.a
[2021-04-30 10:17:29] [build-stdout]   CC      arch/x86/events/intel/core.o
[2021-04-30 10:17:31] [build-stdout]   CC      arch/x86/events/intel/bts.o
...
모니터링으로 수집된 code들은 AST(Abstract Syntax Tree)으로 표현되며, 관계 표현 정보로 전환되어 저장되게 됩니다. 이때 관계 표현 정보들이 저장된 파일을 trap이라 부르며, 나중에 Finalize 과정에서 이 정보들을 병합하는 과정을 거치게 됩니다.
trap에 관계 표현 정보가 어떤식으로 표현되어있는지 trap파일을 살펴보게 되면 다음과 같습니다. 기본적으로 key와 data의 튜플 형태로 정의되어 있으며 각 관계 정보 속에서 상속과 참조를 모두 표현할 수 있습니다.
#key=information
data(key, ...)
대략적으로 아래의 튜플들이 tty_buffer_cancel_work()에서 추출한 관계 정보들을 표현했다는 것을 알 수 있습니다. 간단하게 정리해보자면 #17f에 해당하는 키 정보가 functions(#17f, “tty_buffer_cancel_work”, 1)을 통해서 함수라는 것을, function_return_type(#17f, #122)을 가지고 해당 함수의 return type이 boolean형이라는 것을 추측해볼 수 있습니다.
...
#122=@"type_def_bool_{#123}"
...
function_entry_point(#169, #16e)
.pop
numlines(#169, 4, 4, 0)
#17f=@"fun_decl_tty_buffer_cancel_work(?)"
 .implementation ".../linux-5.11.11/drivers/tty/tty_buffer.c[00000000];lib_linux_x86_64"
.push *
functions(#17f, "tty_buffer_cancel_work", 1)
link_parent(#17f, #11d)
function_return_type(#17f, #122)
#17f_180=@"{#17f}_0_par"
params(#17f_180, #17f, 0, #16c)
...
추출이 모두 끝난 후 Finalize 과정에서 trap정보들을 모두 병합(import)함으로써 하나의 Database로 만들게 됩니다. 그리고 생성된 database, code, database schema를 한 디렉토리에 넣습니다. 이 디렉토리를 Snapshot이라 부르며 앞으로 CodeQL 쿼리를 이용해 질의를 할 수 있습니다.
codeql-database.yml db-cpp log src.zip
database schema는 관계 표현들의 스키마 타입들을 정의하고 있으며 extractor가 이를 바탕으로 관계 표현들을 생성하며, 올바르지 않은 관계 표현 타입이 있는지 검증하는 과정을 거칩니다. 또한 쿼리 과정에서 또한 CodeQL이 가지고 있는 스키마와 Snapshot안에 있는 스키마가 동일한지 검증하게 됩니다. 이는 대게 CodeQL이 업데이트 되면서 Snapshot을 만들어낼 때의 CodeQL 버전과 쿼리를 실행하는 CodeQL 버전의 스키마가 업데이트 되면서 발생하는 불일치를 방지합니다.
아래는 db-cpp/semmlecode.cpp.dbscheme의 내용중 일부입니다. 위에서 보았던 trap의 튜플 구조에 대한 정의와 정보간의 상속 또한 정의되어 있으며 추후 이 데이터들을 쿼리에서 이용하게 됩니다. 이에 대한 내용은 나중에 다시 다루겠습니다.
...
/*
  case @function.kind of
    1 = normal
  | 2 = constructor
  | 3 = destructor
  | 4 = conversion
  | 5 = operator
  | 6 = builtin     // GCC built-in functions, e.g. __builtin___memcpy_chk
  ;
*/
functions(
    unique int id: @function,
    string name: string ref,
    int kind: int ref
);
...
function_return_type(int id: @function ref, int return_type: @type ref);
...
// each function has an ordered list of parameters
#keyset[id, type_id]
#keyset[function, index, type_id]
params(
    int id: @parameter,
    int function: @functionorblock ref,
    int index: int ref,
    int type_id: @type ref
);
...
@localscopevariable = @localvariable | @parameter;
...
Querying
QL은 CodeQL에서 사용하는 객체 지향형 쿼리 언어이며, 구문은 SQL과 유사합니다. 하지만 의미적으로는 Datalog(Declarative logic programming language)에 기반을 두고 있기때문에 QL의 모든 연산이 논리연산으로 취급됩니다.
QL의 기본적인 구조는 다음과 같습니다.
/**
 *
 * Query metadata
 *
 */

import /* ... CodeQL libraries or modules ... */

/* ... Optional, define CodeQL classes and predicates ... */

from /* ... variable declarations ... */
where /* ... logical formula ... */
select /* ... expressions ... */
예시로 QL 라이브러리에서 제공하는 ExecTainted.ql을 이용해 QL 구조를 분석해보겠습니다.
/**
 * @name Uncontrolled data used in OS command
 * @description Using user-supplied data in an OS command, without
 *              neutralizing special elements, can make code vulnerable
 *              to command injection.
 * @kind problem
 * @problem.severity error
 * @precision low
 * @id cpp/command-line-injection
 * @tags security
 *       external/cwe/cwe-078
 *       external/cwe/cwe-088
 */

import cpp
import semmle.code.cpp.security.CommandExecution
import semmle.code.cpp.security.Security
import semmle.code.cpp.security.TaintTracking

from Expr taintedArg, Expr taintSource, string taintCause, string callChain
where
  shellCommand(taintedArg, callChain) and
  tainted(taintSource, taintedArg) and
  isUserInput(taintSource, taintCause)
select taintedArg,
  "This argument to an OS command is derived from $@ and then passed to " + callChain, taintSource,
  "user input (" + taintCause + ")"
가장 먼저 위치하는 구문들은 metadata에 대한 정보들입니다. metadata는 VS Code CodeQL extension에서 결과를 표시할때 사용되지만 없어도 무방한 데이터입니다.
/**
 * @name Uncontrolled data used in OS command
 * @description Using user-supplied data in an OS command, without
 *              neutralizing special elements, can make code vulnerable
 *              to command injection.
 * @kind problem
 * @problem.severity error
 * @precision low
 * @id cpp/command-line-injection
 * @tags security
 *       external/cwe/cwe-078
 *       external/cwe/cwe-088
 */
다음은 import에 대한 정보들입니다. import는 보통 대상이 되는 언어팩과 사용하려고 하는 모듈들을 import해서 사용합니다.
import cpp
import semmle.code.cpp.security.CommandExecution
import semmle.code.cpp.security.Security
import semmle.code.cpp.security.TaintTracking
import의 대상이 되는 파일들은 QL Library의 의미를 가지고 있는 QLL확장자를 가지고 있습니다. QLL은 QL과 달리 연산구문인 from-where-select절이 존재하지 않고 오로지 predicate, module, configuration, class등을 정의하는 쿼리만이 존재하고 이를 불러와 이용이 가능합니다.
# semmle.code.cpp.security.CommandExecution
...
/**
 * A function for running a command using a command interpreter.
 */
class SystemFunction extends FunctionWithWrappers, ArrayFunction, AliasFunction, SideEffectFunction {
  SystemFunction() {
    hasGlobalOrStdName("system") or // system(command)
    hasGlobalName("popen") or // popen(command, mode)
    // Windows variants
    hasGlobalName("_popen") or // _popen(command, mode)
    hasGlobalName("_wpopen") or // _wpopen(command, mode)
    hasGlobalName("_wsystem") // _wsystem(command)
  }

  override predicate interestingArg(int arg) { arg = 0 }

  override predicate hasArrayWithNullTerminator(int bufParam) { bufParam = 0 or bufParam = 1 }

  override predicate hasArrayInput(int bufParam) { bufParam = 0 or bufParam = 1 }

  override predicate parameterNeverEscapes(int index) { index = 0 or index = 1 }

  override predicate parameterEscapesOnlyViaReturn(int index) { none() }

  override predicate parameterIsAlwaysReturned(int index) { none() }

  override predicate hasOnlySpecificReadSideEffects() { any() }

  override predicate hasOnlySpecificWriteSideEffects() {
    hasGlobalOrStdName("system") or
    hasGlobalName("_wsystem")
  }

  override predicate hasSpecificReadSideEffect(ParameterIndex i, boolean buffer) {
    (i = 0 or i = 1) and
    buffer = true
  }
}
...
# semmle.code.cpp.security.TaintTracking
...
/**
 * A predictable instruction is one where an external user can predict
 * the value. For example, a literal in the source code is considered
 * predictable.
 */
private predicate predictableInstruction(Instruction instr) {
  instr instanceof ConstantInstruction
  or
  instr instanceof StringConstantInstruction
  or
  // This could be a conversion on a string literal
  predictableInstruction(instr.(UnaryInstruction).getUnary())
}
...
다음 from-where-select 구문은 SQL 형태와 비슷하며, where 조건에서 hold된 표현식들을 결과로 출력하게 됩니다.
from Expr taintedArg, Expr taintSource, string taintCause, string callChain
where
  shellCommand(taintedArg, callChain) and
  tainted(taintSource, taintedArg) and
  isUserInput(taintSource, taintCause)
select taintedArg,
  "This argument to an OS command is derived from $@ and then passed to " + callChain, taintSource,
  "user input (" + taintCause + ")"
위 코드에서 사용된 Expr 말고도 Function, Functioncall, Variable등 QL에서 사용 가능한 데이터 타입 클래스를 QL Class라 지칭합니다. QL Class는 내부적으로 사용 가능한 멤버 함수들과 상속 정보들을 가지고 있습니다.
class Expr extends StmtParent, @expr {
  /** Gets the nth child of this expression. */
  Expr getChild(int n) { exprparents(unresolveElement(result), n, underlyingElement(this)) }

  /** Gets the number of direct children of this expression. */
  int getNumChild() { result = count(this.getAChild()) }

  /** Holds if e is the nth child of this expression. */
  predicate hasChild(Expr e, int n) { e = this.getChild(n) }

  /** Gets the enclosing function of this expression, if any. */
  Function getEnclosingFunction() { result = exprEnclosingElement(this) }

  /** Gets the nearest enclosing set of curly braces around this expression in the source, if any. */
  BlockStmt getEnclosingBlock() { result = getEnclosingStmt().getEnclosingBlock() }

  override Stmt getEnclosingStmt() {
    result = this.getParent().(Expr).getEnclosingStmt()
    or
    result = this.getParent().(Stmt)
    or
    exists(Expr other | result = other.getEnclosingStmt() and other.getConversion() = this)
    or
    exists(DeclStmt d, LocalVariable v |
      d.getADeclaration() = v and v.getInitializer().getExpr() = this and result = d
    )
    or
    exists(ConditionDeclExpr cde, LocalVariable v |
      cde.getVariable() = v and
      v.getInitializer().getExpr() = this and
      result = cde.getEnclosingStmt()
    )
  }
	...
예시로 Function QL Class를 살펴보게 되면 @function 으로부터 상속된 것을 확인할 수 있는데, 이는 @function id(key)를 가지고 있는 모든 데이터를 hold하게 된다는 의미이며, getName() 함수에서 스키마에 정의된 functions(…) 튜플을 이용해 원하는 데이터를 반환 하는 것 또한 볼 수 있습니다.
class Function extends Declaration, ControlFlowNode, AccessHolder, @function {
  override string getName() { functions(underlyingElement(this), result, _) }
...
functions(
    unique int id: @function,
    string name: string ref,
    int kind: int ref
);
결과적으로 이러한 QL Class를 데이터 타입으로 이용하기 때문에, 조건에 부합하는 데이터를 찾기 쉬워지며, 복잡한 조건 또한 연산을 통해서 해결할 수 있습니다. 다음은 예시입니다.
- 몸체에서 특정한 함수 A를 호출하며 이 호출되는 함수A의 인자가 사용자 입력으로 사용되는 함수
- 함수 A의 인자로 사용 되었으나, 함수 B에서도 인자로 사용되는 동일한 변수
하지만 조건이 복잡해질 수록 연산량은 많아지기 때문에 분석 시간이 늘어난다는 한계가 있습니다. 특히 CodeQL에서 중요하게 이용되는 Taint의 경우는 코드, 데이터간의 CFG, DF를 모두 연산하기 때문에 속도가 느리다는 단점이 있습니다.
Using CodeQL
Setup the Environment
CodeQL을 이용하기 전에 다음 항목들을 준비해줍시다.
-
Visual Studio Code - CodeQL 플러그인
-
CodeQL CLI 바이너리
Visual Studio Code에서 CodeQL 플러그인을 지원하며 해당 플러그인을 이용해 Visual Studio Code에서 CodeQL의 쿼리 실행과 결과 분석들을 진행할 수 있습니다. 하지만 작동을 위해서는 CodeQL CLI 바이너리가 필요하며 따로 다운로드 받아 준비해줍니다.
환경 세팅을 다 하셨다면 codeql 명령어를 사용할 수 있게 됩니다. 다음과 같이 usage 옵션에 대한 설명이 출력된다면 이용 가능한 상태입니다.
$ codeql
Usage: codeql <command> <argument>...
Create and query CodeQL databases, or work with the QL language.

GitHub makes this program freely available for the analysis of open-source software and certain other uses, but it is not itself free software. Type codeql --license to see the license terms.

      --license              Show the license terms for the CodeQL toolchain.
Common options:
  -h, --help                 Show this help text.
  -v, --verbose              Incrementally increase the number of progress messages printed.
  -q, --quiet                Incrementally decrease the number of progress messages printed.
Some advanced options have been hidden; try --help -v for a fuller view.
Commands:
  query     Compile and execute QL code.
  bqrs      Get information from .bqrs files.
  database  Create, analyze and process CodeQL databases.
  dataset   [Plumbing] Work with raw QL datasets.
  test      Execute QL unit tests.
  resolve   [Deep plumbing] Helper commands to resolve disk locations etc.
  execute   [Deep plumbing] Low-level commands that need special JVM options.
  version   Show the version of the CodeQL toolchain.
  generate  Generate formatted QL documentation.
  github    Commands useful for interacting with the GitHub API through CodeQL.
CodeQL Database를 생성하는 기본 명령어는 다음과 같습니다. {database_name}으로 이름을 설정해주며 -l 옵션으로 타겟의 언어(c/c++, java, python, …)을 설정해주고 -c 옵션으로 command(build, run)를 설정해줄 수 있습니다. 아래에 예시와 함께 실제 실행 과정을 첨부하였으니 참고하시기 바랍니다.
$ codeql database create {database_name} -l {language} -c {build command}
$ codeql database create example1.db -l java -c "mvn package"
$ codeql database create example2.db -l cpp -c "make O=out"
$ codeql database create example3.db -l cpp -c "gcc -o example example.c"
...
$ codeql database create "linux-5.11.11.db" -l cpp -c "make"
Initializing database at linux-5.11.11.db.
Running command [make] in .
[2021-04-28 15:41:23] [build-stdout]   SYSTBL  arch/x86/include/generated/asm/syscalls_32.h
[2021-04-28 15:41:23] [build-stdout]   SYSHDR  arch/x86/include/generated/asm/unistd_32_ia32.h
...
[2021-04-28 16:30:50] [build-stdout]   LD [M]  net/netfilter/xt_nat.ko
Finalizing database at linux-5.11.11.db.
Successfully created database at linux-5.11.11.db.
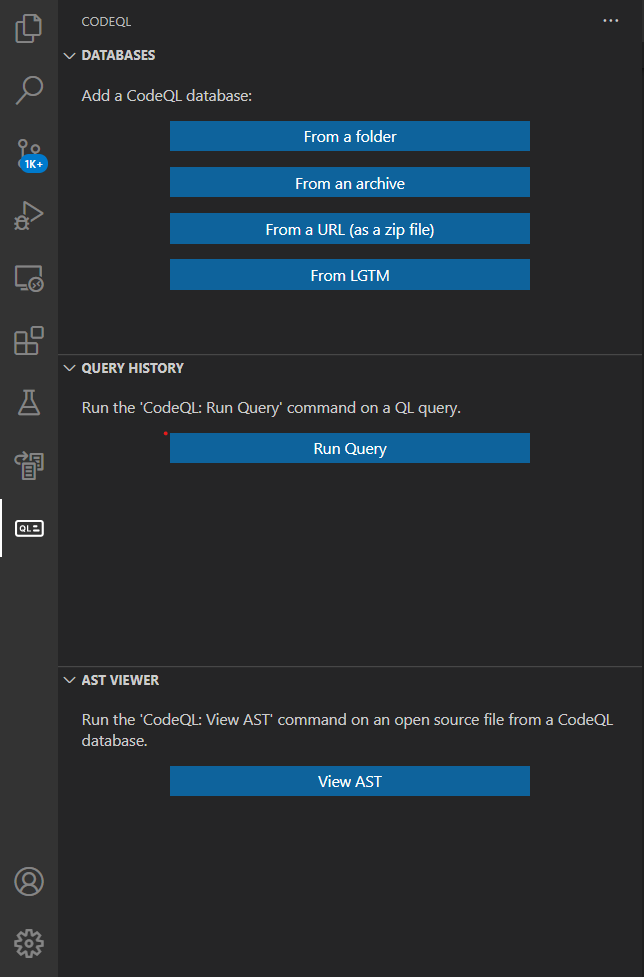
Visual Studio Code에서 CodeQL 플러그인을 설치하면 다음과 같이 QL탭이 추가되있는 것을 확인할 수 있고, 해당 탭을 클릭한 후 DATABASES 탭에서 CodeQL Database를 불러올 수 있습니다. 앞서 생성한 Database를 불러오시면 됩니다.
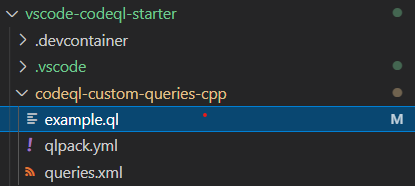
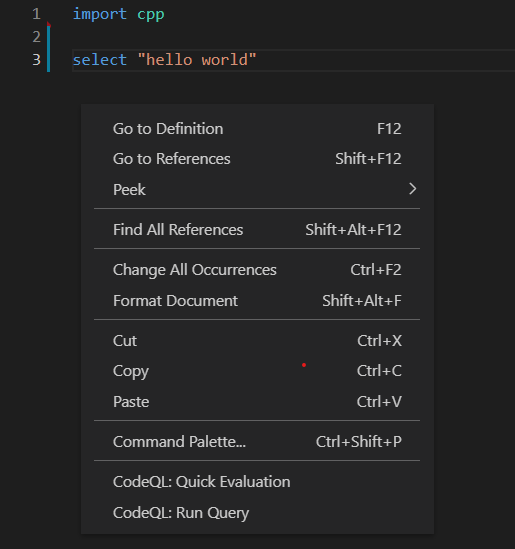
Database를 불러오고 난 후, 준비한 vscode-codeql-starter에서 codeql-custom-queries-cpp폴더 아래 example.ql을 수정해 CodeQL: Run Query를 실행하면 정상적으로 쿼리가 작동하는 것을 확인할 수 있습니다.
import cpp
select "hello world"

Basic
기본적인 쿼리들을 이용해서 쿼리 결과를 살펴봅시다. 다음은 FunctionCall에 해당하는 모든 정보들을 검색합니다. FunctionCall은 함수를 호출하는 모든 구문을 찾아내게 됩니다. 호출하는 함수에 대한 조건은 없으니 ‘모든 호출 구문’을 검색하게 됩니다.
import cpp
from FunctionCall f
select f
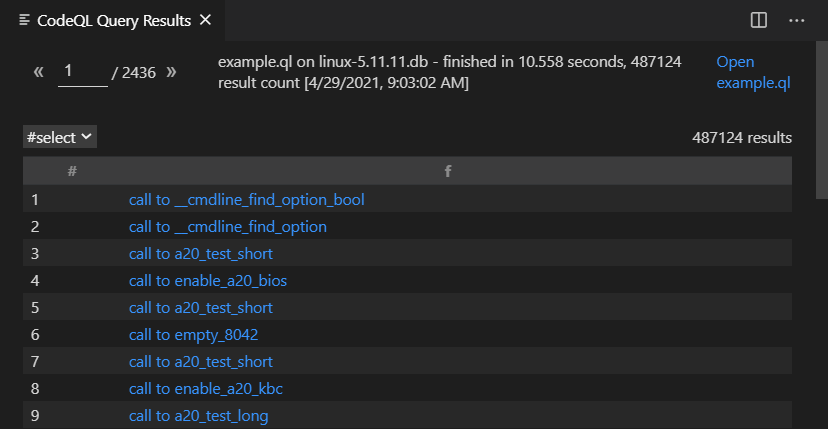
실제로 결과를 클릭해서 레퍼런스를 따라가게 되면 함수가 호출되는 부분을 찾아갈 수 있습니다.
static inline int cmdline_find_option_bool(const char *option)
{
	unsigned long cmd_line_ptr = boot_params.hdr.cmd_line_ptr;

	if (cmd_line_ptr >= 0x100000)
		return -1;      /* inaccessible */

	return __cmdline_find_option_bool(cmd_line_ptr, option);
}
이번엔 함수의 이름이 ‘memcpy’인 FunctionCall만을 잡도록 했습니다.
import cpp

from FunctionCall f
where f.getTarget().getName() = "memcpy"
select f
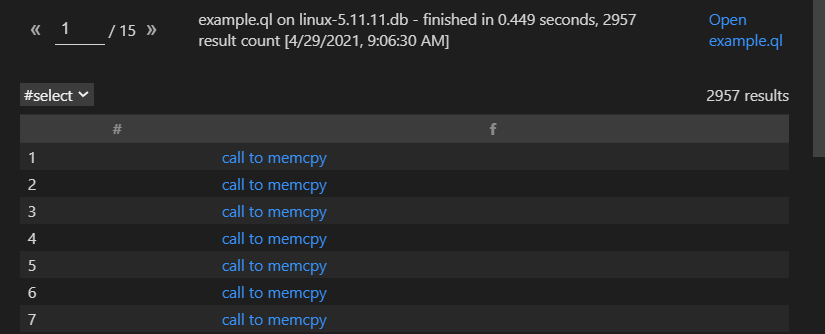
memcpy를 호출하는 모든 부분을 찾는 것을 확인할 수 있습니다.
static inline void clone_pgd_range(pgd_t *dst, pgd_t *src, int count)
{
	memcpy(dst, src, count * sizeof(pgd_t));
#ifdef CONFIG_PAGE_TABLE_ISOLATION
	if (!static_cpu_has(X86_FEATURE_PTI))
		return;
	/* Clone the user space pgd as well */
	memcpy(kernel_to_user_pgdp(dst), kernel_to_user_pgdp(src),
	       count * sizeof(pgd_t));
#endif
}
참고로 이는 FunctionCall이 hold하는 과정은 다음과 같습니다.
# FunctionCall.qll
class FunctionCall extends Call, @funbindexpr {
  FunctionCall() { iscall(underlyingElement(this), _) }
...

# Call.qll
...
/**
 * Gets the function called by this call.
 *
 * In the case of virtual function calls, the result is the most-specific function in the override tree (as
 * determined by the compiler) such that the target at runtime will be one of `result.getAnOverridingFunction*()`.
 */
override Function getTarget() { funbind(underlyingElement(this), unresolveElement(result)) }
...

# semmelcode.cpp.dbscheme
funbind(
    int expr: @funbindexpr ref,
    int fun: @function ref
);
Taint
다음은 Taint 기능에 대한 소개입니다. CodeQL에서 Taint는 CFG와 DF를 이용해서 분석하게 되며 이에 대한 모듈이 이미 만들어져 있기 때문에 사용자는 조건을 정의하는 Configuration 클래스를 정의해주어 사용하는 것이 보통입니다.
CodeQL에서 두가지의 Taint 방법을 이용할 수 있는데 Taint 범위를 기준으로 방법을 나눌 수 있습니다.
-
Local Dataflow
하나의 함수에서 DF를 계산하게 됩니다.
-
Global Dataflow
프로그램 전체에서의 DF를 계산하게 됩니다.
당연하게도 Local Dataflow의 경우 빠르고 정확합니다. 하지만 하나의 함수 범위 내에서의 DF만 계산한다는 점이 한계입니다. Global Dataflow의 경우는 느리며 메모리가 필요로 합니다. 하지만 프로그램 전체에서의 DF를 계산할 수 있기때문에 더 강력하게 작동합니다.
Local Dataflow를 이용해 Taint Tracking을 하고싶다면 다음과 같이 사용할 수 있습니다. 아래 코드는 ‘memcpy’이란 함수의 인자(fc.getArgument(2))가 파라미터(p)로 호출이 되는 모든 경우를 찾게 됩니다.
import cpp
import semmle.code.cpp.dataflow.DataFlow

from Function memcpy, FunctionCall fc, Parameter p
where memcpy.hasQualifiedName("memcpy")
  and fc.getTarget() = memcpy
  and DataFlow::localFlow(DataFlow::parameterNode(p), DataFlow::exprNode(fc.getArgument(2)))
select p
p(size_t count)가 memcpy(_, _, p)로 사용되는 경우를 잡아내는 것을 확인할 수 있습니다.
ssize_t memory_read_from_buffer(void *to, size_t count, loff_t *ppos,
				const void *from, size_t available)
{
	loff_t pos = *ppos;

	if (pos < 0)
		return -EINVAL;
	if (pos >= available)
		return 0;
	if (count > available - pos)
		count = available - pos;
	memcpy(to, from + pos, count);
	*ppos = pos + count;

	return count;
}
EXPORT_SYMBOL(memory_read_from_buffer);
Global Dataflow는 스코프가 없기 때문에 다음과 같은 Configuration 클래스를 확장하여 정의됩니다. 프로그램 전체에서 시작과 끝 지점에 대한 조건을 정의해줌으로써 해당 DF들을 찾아냅니다.
import semmle.code.cpp.dataflow.DataFlow

class MyDataFlowConfiguration extends DataFlow::Configuration {
  MyDataFlowConfiguration() { this = "MyDataFlowConfiguration" }

  override predicate isSource(DataFlow::Node source) {
    ...
  }

  override predicate isSink(DataFlow::Node sink) {
    ...
  }
}
다음과 같은 멤버 함수들을 오버라이드하여 사용자가 정의하는 Dataflow Configuration을 정의할 수 있습니다.
isSource: 데이터 플로우가 시작되는 지점을 정의합니다.isSink: 데이터 플로우가 끝나는 지점을 정의합니다.isBarrier: 특정 조건에서 데이터 플로우를 제한합니다.isBarrierGuard: 특정 조건에서 데이터 플로우를 제한합니다.isAdditionalFlowStep: 추가적인 데이터 플로우 스텝을 정의합니다.
만들어진 Global DataFlow CFG는 다음처럼 사용할 수 있게 됩니다.
from MyDataFlowConfiguration dataflow, DataFlow::Node source, DataFlow::Node sink
where dataflow.hasFlow(source, sink)
select source, "Data flow to $@.", sink, sink.toString()
Global Taint Tracking을 이용하는 것은 Global DataFlow을 이용하는 것과 유사합니다.
import semmle.code.cpp.dataflow.TaintTracking

class MyTaintTrackingConfiguration extends TaintTracking::Configuration {
  MyTaintTrackingConfiguration() { this = "MyTaintTrackingConfiguration" }

  override predicate isSource(DataFlow::Node source) {
    ...
  }

  override predicate isSink(DataFlow::Node sink) {
    ...
  }
}
다음과 같은 멤버 함수들을 오버라이드하여 사용자가 정의하는 Taint Configuration을 정의할 수 있습니다.
isSource: 테인트를 시작할 지점을 정의합니다.isSink: 테인트가 끝날 지점을 정의합니다.isSanitizer: 테인트를 제한할 조건을 정의합니다.isSanitizerGuard: 테인트를 제한할 조건을 정의합니다.isAdditionalTaintStep: 추가적인 테인트 스텝을 정의합니다.
다음은 Global Taint가 정상적으로 이루어지는지 확인하기 위한 kmalloc으로 부터 할당된 버퍼가 copy_to_user의 인자로 사용되는 잡는 코드입니다.
import semmle.code.cpp.dataflow.DataFlow

class TestConfig extends DataFlow::Configuration {
  TestConfig() { this = "TestConfig" }

  override predicate isSource(DataFlow::Node source) {
    exists (Function kmalloc |
      source.asExpr().(FunctionCall).getTarget() = kmalloc and
      kmalloc.hasQualifiedName("kmalloc")
    )
  }

  override predicate isSink(DataFlow::Node sink) {
    exists (FunctionCall fc |
      sink.asExpr() = fc.getArgument(1) and
      fc.getTarget().hasQualifiedName("copy_to_user")
    )
  }
}

from Expr kmalloc, Expr copy_to_user, TestConfig config
where config.hasFlow(DataFlow::exprNode(kmalloc), DataFlow::exprNode(copy_to_user))
select copy_to_user, "This 'copy_to_user' uses data from $@.",
kmalloc, "call to 'kmalloc'"
실행 결과로 나온 결과중 하나를 따라 분석해보았습니다. Global Taint를 이용해 많은 함수 플로우를 거치는 과정 속에서도 Source와 Sink Node 조건에 맞게 찾아낸 것을 확인할 수 있습니다.
static int selinux_socket_getpeersec_stream(struct socket *sock, char __user *optval,
					    int __user *optlen, unsigned len)
{
	...
	err = security_sid_to_context(&selinux_state, peer_sid, &scontext,
				      &scontext_len);
	...
	if (copy_to_user(optval, scontext, scontext_len))
		err = -EFAULT;
	...
}
int security_sid_to_context(struct selinux_state *state,
			    u32 sid, char **scontext, u32 *scontext_len)
{
	return security_sid_to_context_core(state, sid, scontext,
					    scontext_len, 0, 0);
}

static int security_sid_to_context_core(struct selinux_state *state,
					u32 sid, char **scontext,
					u32 *scontext_len, int force,
					int only_invalid)
{
	...
	rc = sidtab_entry_to_string(policydb, sidtab, entry, scontext,
				    scontext_len);
	...
}

static int context_struct_to_string(struct policydb *p,
				    struct context *context,
				    char **scontext, u32 *scontext_len)
{
	...
	scontextp = kmalloc(*scontext_len, GFP_ATOMIC);
	if (!scontextp)
		return -ENOMEM;
	*scontext = scontextp;
이 외에도 다양한 QL Class가 많습니다. QL Class와 Module에 대한 레퍼런스는 다음 페이지에서 검색하실 수 있습니다.
Conclusion
이번 글에서는 간략하게 CodeQL의 내부 동작 원리와 간단한 사용법을 알아보았습니다. 다음 파트에서는 CodeQL에서 기본적으로 제공하는 CWE를 대상으로 짜여있는 QL 코드 분석과 Case Study를 통해서 QL을 더 효율적으로 이용하는 방법과 실제 취약점을 찾을 수 있었던 QL 코드들을 분석하면서 CodeQL이 변종 분석(Variant Analysis)에 유용하게 이용될 수 있는지 살펴보도록 하겠습니다.
만약 CodeQL의 Internal을 직접 분석하고자 하신다면 CodeQL-Go를 분석해보시는 것을 추천드립니다. 다른 언어와 다르게 CodeQL-Go는 오픈소스로 만들어져 있으며 분석 또한 자유롭게 허용되기 때문에 자세한 동작원리를 분석하는데 도움이 되실꺼라 생각합니다.
이번 파트의 글은 여기서 마치겠습니다. 다음글에서 뵙도록 하겠습니다.
Reference
https://lgtm.com/help/lgtm/generate-database
https://codeql.github.com/docs/codeql-overview/about-codeql/
https://codeql.github.com/docs/ql-language-reference/about-the-ql-language/
https://codeql.github.com/docs/ql-language-reference/ql-language-specification/
https://codeql.github.com/docs/codeql-language-guides/analyzing-data-flow-in-cpp/