Port Knocking
라온화이트햇 핵심연구팀 최용선
0. 개요
DefCampCTF2020 대회 문제 중 notor 라는 웹/네트워크/포렌식 문제를 풀이하면서 port knoking 에 대한 내용을 알게 되어 이에 대한 포스팅을 하게 되었습니다.
이 글에서는 포트노킹에 대한 기본 개념과 구현, 마지막으로 DefCamp2020의 notor 문제에 대한 풀이를 진행합니다.
1. Port Knocking
포트노킹은 말 그대로 port를 두드리는 행위와 유사합니다. 포트노킹을 사용하면 특정 패턴의 포트를 연속하여 서버에 요청할 경우, 해당 패턴에 알맞는 특정 포트를 개방하거나 폐쇄할 수 있습니다.
예를 들어, 서버 관리자가 특정 서비스를 1234 포트에 올려 사용하고 있다고 가정해봅시다. nmap 등의 포트스캐닝 툴을 이용할 경우, 개방된 포트를 확인할 수 있기 때문에 관리자는 1234 포트를 숨기고 싶어 합니다.
이 때 포트노킹을 사용하면 1234 포트는 평소에 닫아두고, 특정 패턴의 포트 가 순차적으로 요청이 오면 개방하는 방식으로 포트를 숨길 수 있습니다.

평소에는 위와 같이 1234 포트는 닫아두어 요청 시 정상적인 응답이 돌아오지 않습니다. 따라서 포트스캐닝을 통해 해당 포트의 사용 여부를 확인할 수 없습니다.

하지만 포트노킹을 통해 7000, 8000, 9000의 tcp 요청이 들어올 경우 1234 포트를 개방하도록 설정했을 경우 7000, 8000, 9000, 1234 포트에 순차적으로 요청하면 포트가 개방되어 정상적인 응답이 돌아오게 됩니다.
2. 환경 구성
포트노킹을 위한 환경 구성의 순서는 다음과 같습니다.
- knockd 설치
- iptables 초기 설정
- iptables-persistent 설치 (선택)
- knockd 설정
1. knockd 설치
~ apt install knockd
Reading package lists... Done
Building dependency tree
Reading state information... Done
The following NEW packages will be installed:
  knockd
0 upgraded, 1 newly installed, 0 to remove and 23 not upgraded.
Need to get 24.7 kB of archives.
After this operation, 103 kB of additional disk space will be used.
Get:1 http://ap-northeast-2.ec2.archive.ubuntu.com/ubuntu focal-updates/universe amd64 knockd amd64 0.7-1ubuntu3.20.04.1 [24.7 kB]
Fetched 24.7 kB in 0s (59.4 kB/s)
Selecting previously unselected package knockd.
(Reading database ... 124751 files and directories currently installed.)
Preparing to unpack .../knockd_0.7-1ubuntu3.20.04.1_amd64.deb ...
Unpacking knockd (0.7-1ubuntu3.20.04.1) ...
Setting up knockd (0.7-1ubuntu3.20.04.1) ...
Processing triggers for man-db (2.9.1-1) ...
Processing triggers for systemd (245.4-4ubuntu3.4) ...
먼저, apt install 명령어를 통해 knockd를 설치합니다.
2. iptables 초기 설정
~ iptables -A INPUT -p tcp --dport 22 -j DROP
~ iptables -L
Chain INPUT (policy ACCEPT)
target     prot opt source               destination
DROP       tcp  --  anywhere             anywhere             tcp dpt:22
포트노킹을 통해 ssh 서비스를 제한하고자 할 경우 22번 포트를 iptables에서 tcp any<->any deny 정책으로 추가합니다. 이를 통해 모든 IP에서 22번 포트로 접근할 수 없게 됩니다.
3. iptables-persistent 설치 (선택)
~ apt install iptables-persistent
Reading package lists... Done
Building dependency tree
Reading state information... Done
The following additional packages will be installed:
  netfilter-persistent
The following NEW packages will be installed:
  iptables-persistent netfilter-persistent
0 upgraded, 2 newly installed, 0 to remove and 23 not upgraded.
Need to get 13.7 kB of archives.
After this operation, 87.0 kB of additional disk space will be used.
Do you want to continue? [Y/n] Y
Get:1 http://ap-northeast-2.ec2.archive.ubuntu.com/ubuntu focal/universe amd64 netfilter-persistent all 1.0.14 [7232 B]
Get:2 http://ap-northeast-2.ec2.archive.ubuntu.com/ubuntu focal/universe amd64 iptables-persistent all 1.0.14 [6496 B]
Fetched 13.7 kB in 0s (627 kB/s)
Preconfiguring packages ...
Selecting previously unselected package netfilter-persistent.
(Reading database ... 124763 files and directories currently installed.)
Preparing to unpack .../netfilter-persistent_1.0.14_all.deb ...
Unpacking netfilter-persistent (1.0.14) ...
Selecting previously unselected package iptables-persistent.
Preparing to unpack .../iptables-persistent_1.0.14_all.deb ...
Unpacking iptables-persistent (1.0.14) ...
Setting up netfilter-persistent (1.0.14) ...
Created symlink /etc/systemd/system/multi-user.target.wants/netfilter-persistent.service → /lib/systemd/system/netfilter-persistent.service.
Setting up iptables-persistent (1.0.14) ...
update-alternatives: using /lib/systemd/system/netfilter-persistent.service to provide /lib/systemd/system/iptables.service (iptables.service) in auto mode
Processing triggers for man-db (2.9.1-1) ...
Processing triggers for systemd (245.4-4ubuntu3.4) ...
iptables-persistent는 iptables 설정한 뒤 재부팅 시 초기화 되는 문제를 해결하기 위한 패키지입니다. iptables에 등록한 rule을 save 해놓을 경우, 재부팅 시 restore 기능을 통해 해당 내용을 불러와 적용시켜주는 기능을 지원합니다.
4. knockd 설정
~ cat /etc/knockd.conf
[options]
	UseSyslog

[openSSH]
	sequence    = 7000,8000,9000
	seq_timeout = 5
	command     = /sbin/iptables -A INPUT -s %IP% -p tcp --dport 22 -j ACCEPT
	tcpflags    = syn

[closeSSH]
	sequence    = 9000,8000,7000
	seq_timeout = 5
	command     = /sbin/iptables -D INPUT -s %IP% -p tcp --dport 22 -j ACCEPT
	tcpflags    = syn
처음 knockd를 설치했을 당시의 /etc/knockd.conf 파일입니다.
-
sequence는 포트노킹에서 특정 포트를 열기 위한포트의 패턴입니다.sequence = 7000, 8000, 9000 은 서버로 7000, 8000, 9000 포트를 순서대로 요청한다는 의미입니다.
-
seq_timeout은sequence의 패턴을 입력하기까지의 제한시간입니다.seq_timeout = 5 는 이 제한시간이 5초라는 의미입니다.
-
command는sequence가seq_timeout시간 내에 성립되었을 때 실행할 명령어입니다.iptables명령어를 이용하여 특정 IP에 특정 포트를 개방 또는 폐쇄할 수 있습니다.command = /sbin/iptables -A INPUT -s %IP% -p tcp —dport 22 -j ACCEPT 는 inbound 패킷에 대하여 출발지 IP의 tcp 22번(ssh) 포트를 개방하는 rule을 iptables에 추가하는 명령을 의미합니다.
-
tcpflags는sequence로 받는 패킷을 어떤 방식으로 지정할 것인지 지정하는 옵션입니다.tcpflags = syn 은 syn 패킷을 받을 때 인식한다는 의미입니다.
~ nc ctf.choiys.kr 7000; nc ctf.choiys.kr 8000; nc ctf.choiys.kr 9000; ssh root@ctf.choiys.kr
root@ctf.choiys.kr's password:

~ nc ctf.choiys.kr 9000; nc ctf.choiys.kr 8000; nc ctf.choiys.kr 7000
위와 같이 nc를 이용하여 7000, 8000, 9000 포트로 순차적으로 요청할 경우 22번 포트가 개방되어 ssh 서비스를 이용할 수 있게 됩니다.
knockd.conf 의 기본 설정에서는 7000, 8000, 9000 포트를 요청하면 해당 IP에 대해 22번 포트를 개방하고 9000, 8000, 7000 포트를 요청하면 해당 IP에 대해 22번 포트를 폐쇄합니다. 즉, 포트 개방 이후 ssh 연결을 시도한 후 연결을 종료해도 자동으로 22번 포트의 폐쇄가 이루어지지 않습니다.
~ cat /etc/knockd.conf
[options]
	UseSyslog

[openSSH]
	sequence    = 7000,8000,9000
	seq_timeout = 1
	tcpflags    = syn
	start_command = /sbin/iptables -I INPUT -s %IP% -p tcp --dport 22 -j ACCEPT
	cmd_timeout = 10
	stop_command = /sbin/iptables -D INPUT -s %IP% -p tcp --dport 22 -j ACCEPT
위는 이를 해결하기 위해 기본 설정에서 약간 수정한 knockd.conf 입니다.
기본 설정과 달리, 추가된 옵션은 command 대신 start_command 와 stop_command , cmd_timeout 입니다.
start_command는sequence가 정상적으로 처리됐을 경우 실행하는 명령어입니다.stop_command는sequence가 처리된 이후cmd_timeout만큼의 시간이 지났을 때 실행되는 명령어입니다.
이렇게 start_command 와 stop_command 명령을 이용하여 연결이 종료된 이후 자동으로 포트를 닫도록 설정할 수 있습니다.
여기서 발생하는 문제점은 start_command 명령 실행 이후 cmd_timeout 시간이 지날 경우, ssh 서비스 연결 여부와 상관 없이 무조건 stop_command 가 실행된다는 점입니다. 즉, 22번 포트 개방 이후 ssh을 통해 로그인에 성공하더라도 10초가 지난 이후에는 연결이 종료됩니다.
그렇기 때문에 start_command 와 stop_command 를 이용한 자동 폐쇄는 ssh와 같이 연결이 지속적으로 이루어져야 하는 서비스에는 어울리지 않습니다.
~ watch -n11 "for port in 7000 8000 9000; do nc ctf.choiys.kr \$port; done"
ssh와 같은 연결 지속형 서비스와 자동 폐쇄 기능을 함께 사용하기 위해서는 위와 같이 watch 를 사용하여 일정 시간마다 포트를 개방 해주는 작업이 필요합니다.
3. 장단점
장점
- 포트노킹의 패턴을 알지 못하는 공격자로부터 특정 서비스의 포트에 접근할 수 없도록 합니다. 즉, 패턴을 입력하기 전까지 포트가 열려있지 않기 때문에 포트 스캔 시 서비스의 포트를 탐지할 수 없습니다.
- 방화벽의 특정 IP만 허용하는 화이트리스트 정책 대신, 포트노킹의 패턴만 알고 있다면 모든 IP에서 접근이 용이합니다.
단점
- 포트노킹을 수행하는 데몬(knocd)의 작동이 중지될 경우 포트 개방을 위한 정책이 작동하지 않기 때문에 정책에 포함된 서비스를 이용할 수 없습니다. 이는 모니터링 프로세스를 사용하여, 데몬이 중지될 경우 재시작하는 방법으로 해결할 수 있습니다.
- 네트워크 환경이 좋지 않을 경우, 제한 시간(seq_timeout) 내에 패턴(sequence)를 입력하지 못하여 서비스를 이용하지 못하는 경우가 발생할 수 있습니다.
- 패킷 스니핑을 통해 공격자가 패턴(sequence)를 알아낼 수 있기 때문에 포트노킹 단독으로는 사용하기 어렵고, 다른 보안 메커니즘을 추가하여 사용해야합니다.
4. DefCamp2020 notor 문제
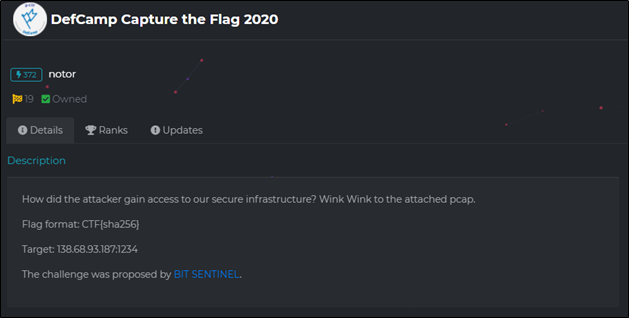
DefCamp2020의 notor 문제입니다.
pcap 파일을 제공하였으며, 패킷을 분석하여 공격자가 서버에 침투하는데 사용한 방법를 찾아내는 것이 목표인 문제였습니다.
서버는 138.68.93.187:1234 라는 것을 명시해주었습니다.
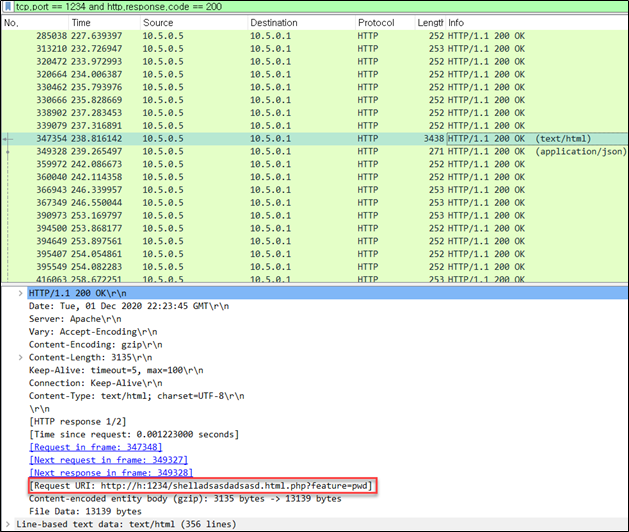
문제 설명에서 서버의 포트를 알려줬기 때문에 wireshark 에서 위와 같이 필터링을 걸어 패킷을 살펴보았습니다.
그 중에서 shelladsasdadsasd.html.php 라는 파일을 요청한 것을 확인할 수 있었고, feature=pwd 라는 쿼리스트링이 포함된 것으로 보아 webshell이라는 것을 파악할 수 있었습니다.
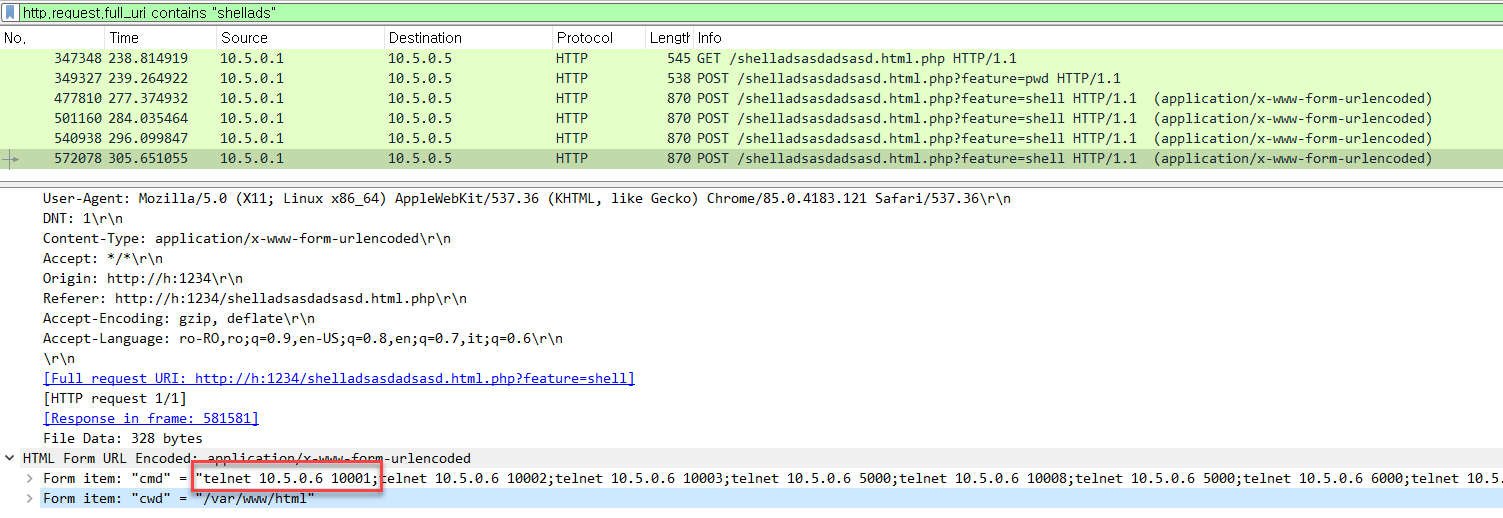
웹쉘에서 telnet을 이용하여 10.5.0.6 에 요청하는 것으로 보아, 문제에서 언급했던 secure infrastructure 가 10.5.0.6 이라는 것을 짐작할 수 있습니다.

10.5.0.6 IP로 필터링하여 패킷을 살펴보면, 위와 같이 특정 패턴의 포트를 요청하는 것을 확인할 수 있습니다. 위의 양상으로 보아 포트노킹이 적용되어 있다는 것을 짐작할 수 있습니다.
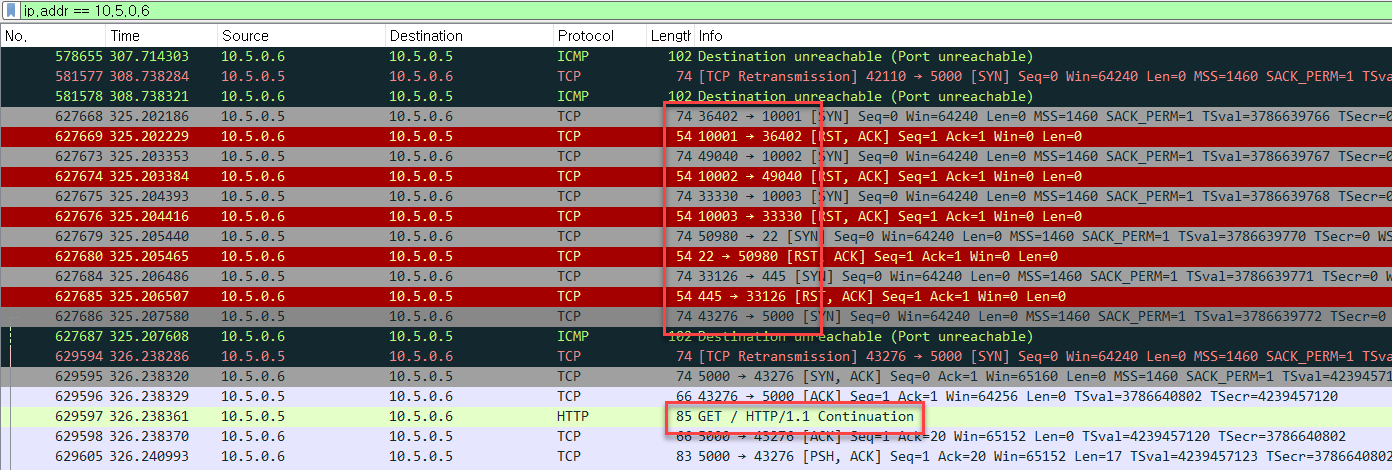
이 중에서 10001, 10002, 10003, 22, 445 포트에 요청한 뒤 5000 포트에 연결을 시도했을 때 연결에 성공한 것을 확인할 수 있었습니다.

문제에서 확인한 서버인 138.68.93.187:1234 에 올라가 있을 shelladsasdadsasd.html.php 에 접근하면 위와 같이 웹쉘을 확인할 수 있었습니다.
여기서 포트노킹의 패턴대로 10001, 10002, 10003, 22, 445 포트에 요청하고, 10.5.0.6 IP의 5000 포트에 HTTP 요청을 보내면 플래그를 얻을 수 있습니다.
5. 마치며
포트노킹은 2000년대 전/후에 주로 사용된 기법이었으며, ssh와 같이 brute force 공격에 노출될 수 있는 서비스 등에 대한 보안 대책으로 사용되거나, 루트킷에 이용되었다고 합니다.
하지만 포트노킹은 장점이 있는 반면, 단점도 명확히 존재하는 기법이기 때문에 실제 시스템에 적용하는 것은 추천하지 않습니다.
요즘은 CTF 문제에 종종 사용되고 있기 때문에 네트워크 관련 문제가 나온다면 한번 쯤 떠올려볼 법 할 것 같습니다.