Intent를 활용한 외부 요청에 대한 패킷 로깅
라온화이트햇 핵심연구팀 원요한
이 문서는 Intent를 활용하여 Activity 전환 시, 요청하는 외부 HTTP 요청을 얻기 위한 아이디어 및 구현 방법, 한계점에 대해서 작성되었습니다.
Intent
Intent란 Android에서 흔히 스크린이라고 하는 Activity간 전환을 위해서 사용되는 객체입니다. 해당 객체를 통해 어떤 Activity로 전환할지 , 전환시 전달할 데이터를 저장 하게 됩니다. 사용방법은 아래와 같습니다.
package kuroneko.com.sampleapp

import android.content.Intent
import android.support.v7.app.AppCompatActivity
import android.os.Bundle
import android.widget.Button

class MainActivity : AppCompatActivity() {

    override fun onCreate(savedInstanceState: Bundle?) {
        super.onCreate(savedInstanceState)
        setContentView(R.layout.activity_main)

        val button: Button = findViewById(R.id.button2)
        button.setOnClickListener {
            val intent = Intent(this, ActivityTwo::class.java).apply {
								putExtra("some", "thing");
						}
		        startActivity(intent)
        }
    }
}
package kuroneko.com.sampleapp

import android.support.v7.app.AppCompatActivity
import android.os.Bundle

class ActivityTwo : AppCompatActivity() {
    override fun onCreate(savedInstanceState: Bundle?) {
        super.onCreate(savedInstanceState)
        setContentView(R.layout.activity_two)

				val message = intent.getStringExtra("some")
				System.out.println(message) // print -> thing
    }
}
Intent의 첫번째 인자로 현재 context와 두 번째 인자로 이동할 클래스를 지정한 이후, startActivity 함수를 호출해 지정된 Activity로 이동하게 됩니다. 따라서, 데이터를 전달하며 여러가지 작업들을 화면전환하며 처리할 수 있게 되었습니다. 또한, 모든 Activity들은 아래와 같이 AndroidManifest.xml에서 정의되어있습니다.
<?xml version="1.0" encoding="utf-8"?>
<manifest xmlns:android="http://schemas.android.com/apk/res/android"
          package="kuroneko.com.sampleapp">

    <application
            android:allowBackup="true"
            android:icon="@mipmap/ic_launcher"
            android:label="@string/app_name"
            android:roundIcon="@mipmap/ic_launcher_round"
            android:supportsRtl="true"
            android:theme="@style/AppTheme">
        <activity android:name=".MainActivity">
            <intent-filter>
                <action android:name="android.intent.action.MAIN"/>

                <category android:name="android.intent.category.LAUNCHER"/>
            </intent-filter>
        </activity>
        <activity android:name=".ActivityTwo">
        </activity>
    </application>

</manifest>
activity tag를 살펴보게 되면, intent-filter를 children으로 가지게 되며 intent를 처리할 때 어떤 방식으로 처리할지 정의하게 됩니다. 또한, 어떤 attribute를 가질 수 있는지 구글링을 통해 찾아보았습니다.
<activity android:allowEmbedded=["true" | "false"]
          android:allowTaskReparenting=["true" | "false"]
          android:alwaysRetainTaskState=["true" | "false"]
          android:autoRemoveFromRecents=["true" | "false"]
          android:banner="drawable resource"
          android:clearTaskOnLaunch=["true" | "false"]
          android:colorMode=[ "hdr" | "wideColorGamut"]
          android:configChanges=["mcc", "mnc", "locale",
                                 "touchscreen", "keyboard", "keyboardHidden",
                                 "navigation", "screenLayout", "fontScale",
                                 "uiMode", "orientation", "density",
                                 "screenSize", "smallestScreenSize"]
          android:directBootAware=["true" | "false"]
          android:documentLaunchMode=["intoExisting" | "always" |
                                  "none" | "never"]
          android:enabled=["true" | "false"]
          android:excludeFromRecents=["true" | "false"]
          android:exported=["true" | "false"]
          android:finishOnTaskLaunch=["true" | "false"]
          android:hardwareAccelerated=["true" | "false"]
          android:icon="drawable resource"
          android:immersive=["true" | "false"]
          android:label="string resource"
          android:launchMode=["standard" | "singleTop" |
                              "singleTask" | "singleInstance"]
          android:lockTaskMode=["normal" | "never" |
                              "if_whitelisted" | "always"]
          android:maxRecents="integer"
          android:maxAspectRatio="float"
          android:multiprocess=["true" | "false"]
          android:name="string"
          android:noHistory=["true" | "false"]
          android:parentActivityName="string"
          android:persistableMode=["persistRootOnly" |
                                   "persistAcrossReboots" | "persistNever"]
          android:permission="string"
          android:process="string"
          android:relinquishTaskIdentity=["true" | "false"]
          android:resizeableActivity=["true" | "false"]
          android:screenOrientation=["unspecified" | "behind" |
                                     "landscape" | "portrait" |
                                     "reverseLandscape" | "reversePortrait" |
                                     "sensorLandscape" | "sensorPortrait" |
                                     "userLandscape" | "userPortrait" |
                                     "sensor" | "fullSensor" | "nosensor" |
                                     "user" | "fullUser" | "locked"]
          android:showForAllUsers=["true" | "false"]
          android:stateNotNeeded=["true" | "false"]
          android:supportsPictureInPicture=["true" | "false"]
          android:taskAffinity="string"
          android:theme="resource or theme"
          android:uiOptions=["none" | "splitActionBarWhenNarrow"]
          android:windowSoftInputMode=["stateUnspecified",
                                       "stateUnchanged", "stateHidden",
                                       "stateAlwaysHidden", "stateVisible",
                                       "stateAlwaysVisible", "adjustUnspecified",
                                       "adjustResize", "adjustPan"]>
</activity>
위와 같이 수많은 attribute를 지정할 수 있는데, 주목해야할 attr은 android:exported 입니다. 해당 attribute가 설정되었다면, 외부에서 intent를 통한 attribute 호출 할 수 없습니다. 내부에서 intent를 통해 Activity 전환을 해야합니다.
외부 요청(HTTP) 패킷 획득방법
제일 먼저 떠올릴 수 있는 방법으로 burp suite나 fiddler의 인증서를 시스템 인증서로 등록한 이후, Proxy를 설정해 모든 기능들을 수동으로 외부 요청을 발생시켜 로깅하는 것입니다. 하지만 수많은 기능들이 존재할 경우, 어느정도의 자동화가 필요합니다. 아래는 자동화에 대한 아이디어 세 가지를 제시합니다.
1. Intent를 통해 Activity 전환 시 발생하는 외부 요청 패킷 로깅
2. adb를 통해 Activity 전환 시 발생하는 외부 요청 패킷 로깅
3. Component 이벤트 처리시 발생하는 외부 요청 패킷 로깅
1. Intent를 통해 Activity 전환 시 발생하는 외부 요청 패킷 로깅
Intent를 발생시키기 위해서는 코드 내에서 startActivity함수를 호출해야합니다. 따라서, frida를 사용하여 처리할 수 있음을 알 수 있습니다. 아래는 그 예시입니다.
// intent 발생시키는 frida 코드
function getContext() {
    try{
        const ActivityThread = Java.use('android.app.ActivityThread');
        const application = ActivityThread.currentApplication();
        return application.getApplicationContext();
    }
    catch(e) { console.log(e); }
}

function getAllActivities() {
    var result = [];
    send("activities");
    var r = recv("activities", function(value) {
        result = value.payload;
    });
    r.wait();
    return result;
}

function callActivity(activityName) {
    try{
        var context = getContext();
        var intent = Java.use("android.content.Intent").$new(
            context,
            Java.use(activityName).class
        );
        intent.addFlags(intent.FLAG_ACTIVITY_NEW_TASK.value | intent.FLAG_ACTIVITY_CLEAR_TOP.value | intent.FLAG_ACTIVITY_SINGLE_TOP.value);
        context.startActivity(intent);
    } catch(e) { console.log(e); }
해당 코드를 사용하여 activity를 호출할 수 있게 되었지만, 보통 앱에서는 여러 파라미터(Action, Category, Extra)를 설정해야 정상적으로 activity가 이벤트를 처리하도록 되어있습니다. 따라서, 모든 Activity의 Action/Category 를 확인하기 위해서 AndroidManifest.xml를 파싱해야합니다. 아래는 AndroidManifest.xml를 파싱하여 frida script로 전달하는 코드입니다.
# androidmanifest.xml 파싱 -> frida script 코드
import frida, sys, os
import xml.etree.ElementTree as ET

code = open("run.js").read()

if len(sys.argv) != 2:
	print("[Usage] python run.py [androidmanifest.xml]")
	exit(-1)

def on_message(message, data):
    if message["type"] == "send":
        if message["payload"] == "activities":
            script.post({ "type": "activities", "payload": activities})

manifest = ET.parse(sys.argv[1]).getroot()
package = manifest.attrib["package"]
application = manifest.find("application")
android = "http://schemas.android.com/apk/res/android"

def name(elem: ET.Element):
    return elem.attrib[f"{{{android}}}name"]

activities = {}
for item in application:
    item: ET.Element = item
    if item.tag == "activity":
        intent_filter = item.findall("intent-filter")
        act_name = item.attrib[f"{{{android}}}name"]
        tname = act_name.replace(package, "")
        activities[ act_name ] = {}
        for pitem in intent_filter:
            activities[ act_name ]["action"] = list(map(name, pitem.findall("action")))
            activities[ act_name ]["category"] = list(map(name, pitem.findall("category")))
            activities[ act_name ]["data"] = [] # pitem.findall("data")

device = frida.get_usb_device()
pid = device.spawn([package])
session = device.attach(pid)
script = session.create_script(code)
script.on("message", on_message)
script.load()

device.resume(pid)

sys.stdin.read()
위의 코드를 활용하면, Extra파라미터를 사용하지않는 Activity가 동작하게 됩니다. 따라서, Activity에서 외부로 요청을 여러번 할 수 있다는 점을 고려하여 어느 정도의 시간 조절이 필요합니다.
2. adb를 통해 Activity 전환 시 발생하는 외부 요청 패킷 로깅
adb는 Android Device Bridge의 약자로 기기와 통신할 수 있는 도구입니다. 해당 툴에서는 여러 기능을 지원하는데, intent를 특정 앱에 전송, broadcast 등을 수행할 수 있습니다. 아래는 activity 실행을 위한 adb 옵션입니다.
# activity 실행하는 adb 커맨드
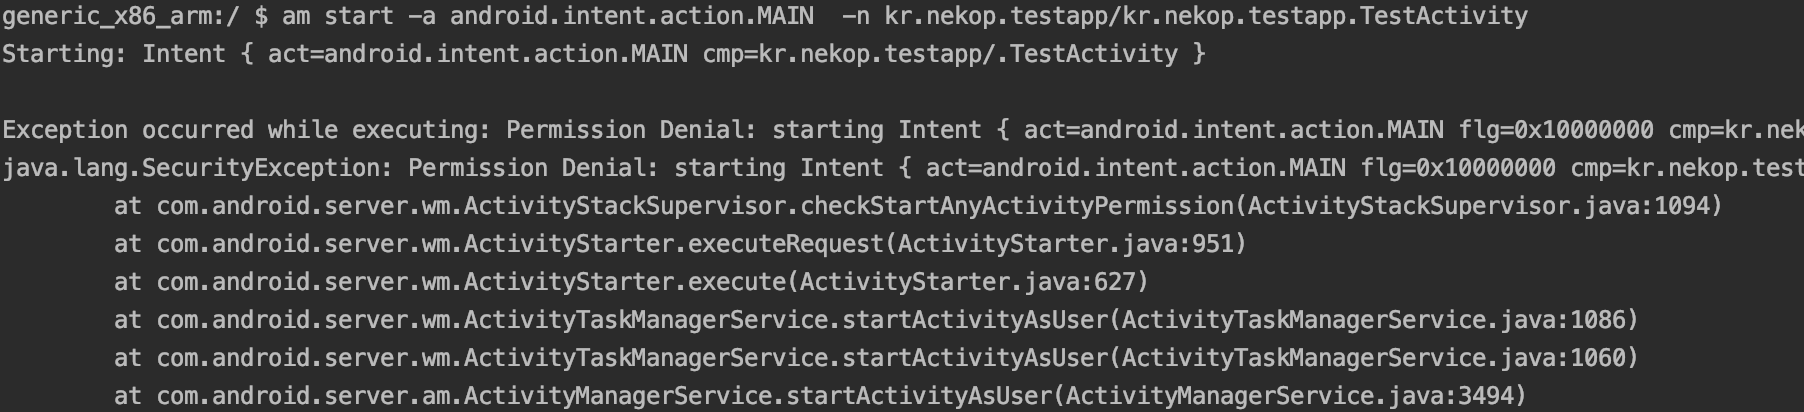
adb shell am start -a {action} -c {category} -n {package}/{activity_name}
하지만 위의 명렁어는 AndroidManifest.xml에서 activity tag의 attribute가 android:exported=true 으로 설정되어 있어야 하며, 해당 옵션이 설정되지 않을 경우 아래와 같이 실패하는 것을 확인할 수 있습니다.
<!-- Sample AnroidManifest.xml -->
<?xml version="1.0" encoding="utf-8"?>
<manifest xmlns:android="http://schemas.android.com/apk/res/android"
    package="kr.nekop.testapp">

    <application
        android:allowBackup="true"
        android:icon="@mipmap/ic_launcher"
        android:label="@string/app_name"
        android:roundIcon="@mipmap/ic_launcher_round"
        android:supportsRtl="true"
        android:theme="@style/AppTheme">
        <activity android:name=".TestActivity" android:exported="false"></activity>
        <activity
            android:name=".MainActivity"
            android:label="@string/title_activity_main"
            android:theme="@style/AppTheme.NoActionBar" />
    </application>

</manifest>
3. Component 이벤트 처리시 발생하는 외부 요청 패킷 로깅
Activity는 여러가지의 Component로 구성됩니다. Button, List, Layout 등으로 여러 기능들을 시각화해서 사용자가 접근 및 사용하기 쉽게 만듭니다. 따라서, 해당 기능들은 Component에 종속적으로 구현되어있습니다. 그러므로 Component의 이벤트를 강제로 발생시켜 여러가지 기능들을 수행할 수 있도록 만들면 더욱 많은 외부 요청을 할 수 있을 것으로 보입니다. Layout을 확인하기 위해서는 디컴파일 이후, resource 폴더 내의 layout을 확인하면 됩니다. 아래는 그 예시입니다.
<!-- sample layout.xml -->
<?xml version="1.0" encoding="utf-8"?>
<androidx.coordinatorlayout.widget.CoordinatorLayout xmlns:android="http://schemas.android.com/apk/res/android"
    xmlns:app="http://schemas.android.com/apk/res-auto"
    xmlns:tools="http://schemas.android.com/tools"
    android:layout_width="match_parent"
    android:layout_height="match_parent"
    tools:context=".MainActivity">

    <com.google.android.material.appbar.AppBarLayout
        android:layout_width="match_parent"
        android:layout_height="wrap_content"
        android:theme="@style/AppTheme.AppBarOverlay">

        <androidx.appcompat.widget.Toolbar
            android:id="@+id/toolbar"
            android:layout_width="match_parent"
            android:layout_height="?attr/actionBarSize"
            android:background="?attr/colorPrimary"
            app:popupTheme="@style/AppTheme.PopupOverlay" />

        <TextView
            android:id="@+id/textView"
            android:layout_width="wrap_content"
            android:layout_height="wrap_content"
            android:text="MainActivity!!!" />

        <Button
            android:id="@+id/button"
            android:layout_width="match_parent"
            android:layout_height="wrap_content"
            android:text="Button" />

    </com.google.android.material.appbar.AppBarLayout>

    <include layout="@layout/content_main" />

    <com.google.android.material.floatingactionbutton.FloatingActionButton
        android:id="@+id/fab"
        android:layout_width="wrap_content"
        android:layout_height="wrap_content"
        android:layout_gravity="bottom|end"
        android:layout_margin="@dimen/fab_margin"
        app:srcCompat="@android:drawable/ic_dialog_email" />

</androidx.coordinatorlayout.widget.CoordinatorLayout>
위의 xml파일을 파싱한 이후, frida script로 전달해서 component 타입별로 이벤트를 강제로 발생하도록 아래와 같이 코드를 작성합니다.
function getContext() {
    try{
        const ActivityThread = Java.use('android.app.ActivityThread');
        const application = ActivityThread.currentApplication();
        return application.getApplicationContext();
    }
    catch(e) { console.log(e); }
}

function findViewById(id, type) {
    var activity = Java.cast(getContext(), Java.use("android.app.Activity"));
    return Java.cast(activity.findViewById(id), type);
}

var typeInfo = {
    "button": {
        _class: Java.use("android.widget.Button"),
        handle: function(btn) {
            btn.performClick();
        },
    }
}

function componentEvent(id, type) {
    var info = typeInfo[type];
    var view = findViewById(id, info._class);
    info.handle(view);
}

function fuzz() {
    var result = [];
    send("component");
    /*
    {
        "type": "button",
        "id": 123124123
    }
    */
    var r = recv("component", function(value) {
        result = value.payload;
    });
    r.wait();
    for(var i = 0; i < result.length; i++) {
        componentEvent(result[i].id, result[i].type);
    }
}
해당 코드를 사용하여 여러 앱에 적용하면 어느 정도의 외부 요청을 기대할 수 있습니다.
한계점
각각의 방식은 모든 외부 요청을 발생시킬 수 없다는 공통적인 한계점이 존재합니다. 따라서 어느 정도 많은 양의 외부 요청을 발생시킬 수 있는지에 대해서 고려되어야합니다. 또한, Activity별 외부 요청에 대한 처리와 빠른 시간 내에 많은 외부 요청 URL을 파악할 수 있어야합니다.
1번 방식의 경우, extra를 사용하지 않는 activity에서 외부 요청을 할 수 있으므로 적은 양의 URL을 로깅할 수 있을 것으로 보이며, 2번 방식의 경우 android:exported=true 옵션이 설정되어있지 않은 activity와 extra를 사용하지 않는 activity에 대해서 처리할 수 있으므로 1번의 방식보다 적은 양의 URL을 로깅할 수 있을 것으로 보입니다. 3번의 방식으로 코드를 작성할 경우, 사용자가 직접 조작하는 것처럼 할 수 있다면 많은 양의 외부 요청을 가져올 수 있을 것으로 보입니다. 하지만 이는 각 component별 상관관계(ex. 로그인, 검색 등)가 전혀 고려되어있지 않습니다. 따라서, activity별 component 수에 따라서 모든 URL을 로깅하기 위한 시간이 결정됩니다. 그러므로 많은 component가 존재한다면 모든 요청을 위해서 수많은 요청이 필요하게 되며 효율성이 떨어지게 됩니다.