Frida-gum을 이용한 Android Hook
라온화이트햇 핵심연구팀 김재성
Frida-gum
https://github.com/frida/frida-gum
Frida-gum은 Frida 후킹 프레임워크의 일부 기능을 담은 모듈로 코드 인라인 후킹, 코드 추적, 메모리 스캐너 등의 기능이 포함되어있습니다.
해당 라이브러리를 사용하면 frida의 후킹 기능만 따로 C++로 작성하여 활용할 수 있습니다.
Build (Tested on Ubuntu 18.04/19.10)
Android frida-gum을 사용하려면 Android NDK 사전 설치가 필요합니다.
Android NDK는 r21 버전까지 릴리즈되었으나 frida는 공식적으로 r20 버전까지 지원합니다.
(현재 글 작성 시점 2020. 03. 26 기준)
apt install -y unzip
wget https://dl.google.com/android/repository/android-ndk-r20-linux-x86_64.zip
unzip android-ndk-r20-linux-x86_64.zip
rm -rf android-ndk-r20-linux-x86_64.zip
mv ./android-ndk-r20 /opt/
맨 아래에 다음 줄을 추가하고 source ~/.bashrc를 입력합니다. 정상적으로 설정되었다면 ndk-build 명령어 사용이 가능해야합니다.
export ANDROID_NDK_ROOT=/opt/android-ndk-r20
export PATH=$PATH:$ANDROID_NDK_ROOT
frida-gum 빌드를 위해 npm, python2를 설치하고 아래 명령어를 입력합니다.
cd /root
apt install python git npm make
git clone --recursive [https://github.com/frida/frida](https://github.com/frida/frida-gum)
cd frida
위 과정까지 진행했다면 아래 명령어를 입력했을때 android gum 라이브러리가 정상적으로 빌드됩니다. 문서 기준으로 빌드 디렉토리는 /root/frida/build에 생성됩니다.
make gum-android-arm64
Frida releases에 prebuilt된 frida-gum을 내려받습니다. releases에는 frida-gum.h 헤더파일과 간단한 후킹 예제가 포함되어있습니다.
wget [https://github.com/frida/frida/releases/download/12.8.18/frida-gum-devkit-12.8.18-android-arm64.tar.xz](https://github.com/frida/frida/releases/download/12.8.18/frida-gum-devkit-12.8.18-android-arm64.tar.xz)
mkdir androidhook
cd androidhook
tar -xf [frida-gum-devkit-12.8.18-android-arm64.tar.xz](https://github.com/frida/frida/releases/download/12.8.18/frida-gum-devkit-12.8.18-android-arm64.tar.xz)
rm -rf [frida-gum-devkit-12.8.18-android-arm64.tar.xz](https://github.com/frida/frida/releases/download/12.8.18/frida-gum-devkit-12.8.18-android-arm64.tar.xz)
frida-gum-example.c를 컴파일하기 위해 다음 명령어를 입력하면 frida-gum-example 바이너리가 생성됩니다.
/opt/android-ndk-r20/toolchains/llvm/prebuilt/linux-x86_64/bin/aarch64-linux-android21-clang -fPIC -DANDROID -ffunction-sections -fdata-sections -Wall -Os -pipe -g3 frida-gum-example.c -o frida-gum-example -L. -lfrida-gum -llog -ldl -lm -fuse-ld=gold -Wl,--icf=all,--gc-sections,-z,noexecstack,-z,relro,-z,now -L/root/frida/build/frida-android-arm64/lib -L/root/frida/build/sdk-android-arm64/lib
Hook
아래는 frida-gum 을 이용한 후킹 예제 코드의 일부입니다.
...

int
main (int argc,
      char * argv[])
{
  GumInterceptor * interceptor;
  GumInvocationListener * listener;

  gum_init_embedded ();

  interceptor = gum_interceptor_obtain ();
  listener = g_object_new (EXAMPLE_TYPE_LISTENER, NULL);

  gum_interceptor_begin_transaction (interceptor);
  gum_interceptor_attach (interceptor,
      GSIZE_TO_POINTER (gum_module_find_export_by_name (NULL, "open")),
      listener,
      GSIZE_TO_POINTER (EXAMPLE_HOOK_OPEN));
  gum_interceptor_attach (interceptor,
      GSIZE_TO_POINTER (gum_module_find_export_by_name (NULL, "close")),
      listener,
      GSIZE_TO_POINTER (EXAMPLE_HOOK_CLOSE));
  gum_interceptor_end_transaction (interceptor);

  close (open ("/etc/hosts", O_RDONLY));
  close (open ("/etc/fstab", O_RDONLY));

  g_print ("[*] listener got %u calls\n", EXAMPLE_LISTENER (listener)->num_calls);

  gum_interceptor_detach (interceptor, listener);

  close (open ("/etc/hosts", O_RDONLY));
  close (open ("/etc/fstab", O_RDONLY));

  g_print ("[*] listener still has %u calls\n", EXAMPLE_LISTENER (listener)->num_calls);

  g_object_unref (listener);
  g_object_unref (interceptor);

  gum_deinit_embedded ();

  return 0;
}

static void
example_listener_on_enter (GumInvocationListener * listener,
                           GumInvocationContext * ic)
{
  ExampleListener * self = EXAMPLE_LISTENER (listener);
  ExampleHookId hook_id = GUM_IC_GET_FUNC_DATA (ic, ExampleHookId);

  switch (hook_id)
  {
    case EXAMPLE_HOOK_OPEN:
      g_print ("[*] open(\"%s\")\n", gum_invocation_context_get_nth_argument (ic, 0));
      break;
    case EXAMPLE_HOOK_CLOSE:
      g_print ("[*] close(%d)\n", (int) gum_invocation_context_get_nth_argument (ic, 0));
      break;
  }

  self->num_calls++;
}
...
아래의 방법을 참고하면 후킹할 함수를 조금 더 유연하게 제어할 수 있습니다.
-
gem_interceptor_attach로 리스너를 등록하면 함수가 호출되었을 때on_enter→original_func→on_leave순으로 호출됩니다. 별도 문서화된 내용은 없으나gem_interceptor_replace함수를 사용하면 원본 함수를 호출하지 않고 새로운 함수로 대체할 수 있습니다. -
on_enter핸들러에서 인자값을 가져오거나 조작할 수 있습니다. 인자값 획득:gum_invocation_context_get_nth_argument(ic, index);인자값 조작:gum_invocation_context_replace_nth_argument (ic, index, raw_value); -
on_leave핸들러에서 원래 반환값을 가져오거나 반환값을 대체할 수 있습니다. 반환값 획득:gum_invocation_context_get_return_value(ic);반환값 대체:gum_invocation_context_replace_return_value(ic, raw_value);
해당 바이너리를 다른 App에 인젝션하면 print 출력 로그를 볼 수 없기 때문에 logcat을 통해 로그를 확인할 수 있도록 필요한 코드를 추가하고 g_print 함수를 LOGI로 전부 대체합니다.
#include <fcntl.h>
#include <unistd.h>
#include <android/log.h>

#define __flush_cache(c, n)        __builtin___clear_cache(reinterpret_cast<char *>(c), reinterpret_cast<char *>(c) + n)
#define LOGNAME "HOOKTEST"
#define LOGV(...) __android_log_print(ANDROID_LOG_VERBOSE, LOGNAME, __VA_ARGS__)
#define LOGD(...) __android_log_print(ANDROID_LOG_DEBUG  , LOGNAME, __VA_ARGS__)
#define LOGI(...) __android_log_print(ANDROID_LOG_INFO   , LOGNAME, __VA_ARGS__)
#define LOGW(...) __android_log_print(ANDROID_LOG_WARN   , LOGNAME, __VA_ARGS__)
#define LOGE(...) __android_log_print(ANDROID_LOG_ERROR  , LOGNAME, __VA_ARGS__)
그리고 바이너리가 App에 인젝션 되었을 때 Hook 코드가 바로 실행될 수 있도록 진입점 int main() { ... }을 **__attribute**((constructor)) int init(void *arg) { ... }로 대체한 다음, 아래와 같이 -shared 옵션을 추가하여 so 바이너리로 빌드되도록 합니다.
/opt/android-ndk-r20/toolchains/llvm/prebuilt/linux-x86_64/bin/aarch64-linux-android21-clang -fPIC -DANDROID -ffunction-sections -fdata-sections -Wall -Os -pipe -g3 frida-gum-example.c -o frida-gum-example -L. -lfrida-gum -llog -ldl -lm -fuse-ld=gold -Wl,--icf=all,--gc-sections,-z,noexecstack,-z,relro,-z,now -L/root/frida/build/frida-android-arm64/lib -L/root/frida/build/sdk-android-arm64/lib **-shared**
Injection
빌드한 바이너리를 인젝션해주는 인젝터는 아래 소스코드를 변형하여 사용하였습니다. https://github.com/jekinleeph/LibInjectAll/blob/master/inject.c
기본적인 인젝션 원리는 ptrace를 이용해 대상 프로세스에 dlopen("/path/to/hook.so"); 원격 호출을 유도하는 것입니다.
int main(int argc, char const *argv[]) {
    if (argc != 3) {
        printf("Usage: %s [process id] [library full path]\n", argv[0]);
        return -1;
    }

    pid_t pid = atoi(argv[1]);
    const char *lib = argv[2];

    if (!pid) {
        printf("[+] TestInject dlopen(%s)\n", lib);
        void *r = dlopen(lib, RTLD_NOW | RTLD_LOCAL);
        printf("[+] TestInject Result=%p\n", r);
        sleep(-1);
    }

    if (ptrace_attach(pid) == -1) {
        printf("[-] ptrace_attach failed\n");
        return -1;
    }

    long raddr = remote_call(pid, mmap, 6LL, 0LL, 0x400LL, PROT_READ | PROT_WRITE, MAP_PRIVATE | MAP_ANONYMOUS, 0LL, 0LL);
    if (!raddr) {
        printf("[-] remote mmap() failed !!\n");
        return -1;
    }

    ptrace_write(pid, (uint8_t*)raddr, (uint8_t*)lib, strlen(lib) + 1);
    if (!remote_call(pid, dlopen, 2, raddr, RTLD_NOW | RTLD_LOCAL))
    {
        printf("[-] remote dlopen() failed !!\n");
        return -1;
    }

    if (remote_call(pid, munmap, 2, raddr, 0x400LL)) {
        printf("[-] remote munmap() failed !!\n");
        return -1;
    }

    ptrace_detach(pid);
    printf("[+] injected pid=%d raddr=%p\n", pid, (void *)raddr);
    return 0;
}
injector 압축을 풀고 ndk-build를 실행하면 ~/injector/libs/arm64-v8a 디렉토리에 injector 바이너리가 생성됩니다.
테스트 단말을 PC에 연결하고 adb push명령어로 injector와 frida-gum-example을 /data/local/tmp 디렉토리에 push합니다.
인젝션할 대상 프로세스를 ps 명령어로 PID를 확인한 다음, 아래와 같이 입력합니다.
여기서 so 바이너리 위치는 절대경로를 입력해야하고 App에서 접근 가능한 디렉토리에 있어야합니다. (Windows 환경에서 NtCreateThreadEx를 이용한 Dll Injection도 비슷한 이유로 절대경로가 요구됩니다.)
/data/local/tmp$ su
/data/local/tmp# ls
injector frida-gum-example
/data/local/tmp# mount -o rw,remount /system
/data/local/tmp# cp ./frida-gum-example /system/lib64/
/data/local/tmp# chmod +x *
/data/local/tmp# ./injector
**Usage: %s [process id] [library full path]**
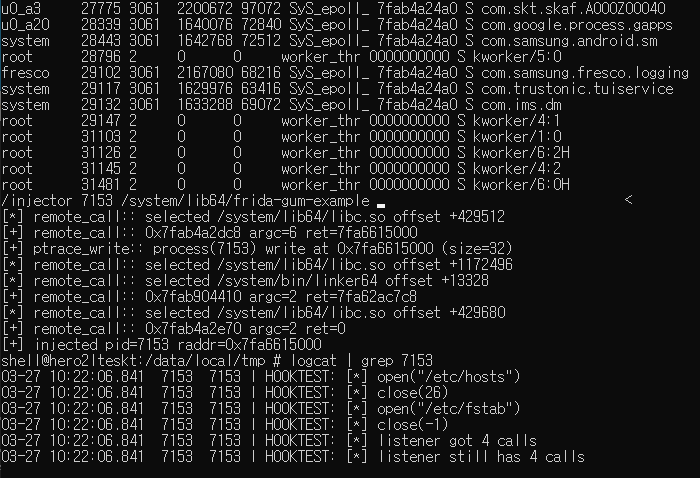
/data/local/tmp# ./injector <pid> /system/lib64/frida-gum-example
문서에서는 앱별 권한 이슈가 있어 frida-gum-example을 /system/lib64/로 복사한다음 인젝션하였습니다.
앱이 대상으로 정상적으로 인젝션되었다면 아래 그림과 같이 logcat을 통해 후킹 관련 로그를 확인할 수 있습니다.